The great thing about our Campaign Designer is that it contains a lot of objects to give you numerous possibilities, but we understand that it might get confusing at times. Our best tip is to just give it a try! Create a new campaign and experiment with the objects. Use a test group with your own record to select possible customers and you can’t really go wrong.
To help you, we have provided a description of the various objects and included them in the manual under the categories as you would find them in the objects library in Deployteq.
- Start Objects
- Channel Objects
- Content Objects
- Data model Objects
- Flow Objects
- Customer Objects
- Environment Objects
- Other Objects
- Creating user-defined campaign objects
Start Objects
| Icon | Function | Settings |
|---|---|---|
| Use the ‘Start on Time’ object to activate a path in the campaign at a predetermined time. | Give the object a name. You can then choose between two types of start times: Campaign Start or Static. If you choose ‘Campaign Start’, the path will be activated as soon as you turn on the campaign. If the start date is changed in the campaign settings, the start date for the path will also change. For ‘Static’, you must enter a set date and time. This can also be at a time after the campaign has already started. |
| The ‘Start on Event’ object specifies the starting point of a campaign path. Unlike the ‘Start on Time’ object, the starting point is not determined by a predefined time, but by when an event occurs. This could be a ‘Bounce’ from a QuickMail or an ‘Unsubscribe’ process started when a contact clicks on ‘Unsubscribe’. The ‘Start on Event’ object can also be used to activate a campaign path on the basis of a form not defined in Deployteq, but defined on the contact’s website. The object can read the values from the form and make them available within the campaign, so that they can be processed in Deployteq. The ‘Start on Event’ object will become the default starting point of a campaign when a ‘Bounce’ or ‘Unsubscribe’ process is created using the Campaign Designer. | The ‘Start on Event’ object has a URL. When you place a form with an iframe on your website, it is best to use the URL of this start object. This is because it does not change, even though you may use a different page or want to perform an extra action before the customer arrives at the landing page. In addition, you can set variables that can be saved as part of environment variables. These can be enclosed with the URL. |
| A path in the campaign can be activated at a predetermined date and time, and this can be repeated at set intervals. | Give the object a name and configure the start time. If you choose ‘Campaign Start’, the path will be activated as soon as the campaign goes live. If the start date is changed in the campaign settings, the start date for the path will also change. For ‘Static’, you must enter a set date and time. This can also be at a time after the campaign has already started. You then configure the repeat interval and, if desired, specify an end date for the interval. |
| Use the ‘Start on SMS’ object to start a campaign via an inbound SMS. | You must specify in this object which keyword will trigger the start of the campaign. A ‘Start on SMS’ object can respond to more than one keyword. | |
| The stop object makes it possible to halt a campaign. This can be set to happen if a contact follows a certain path through the campaign, or it can be set to take place at a certain time with the use of a timer. Users who enter the campaign once it has been stopped will be redirected to the ‘End URL’ for the campaign. | No configuration is necessary for this object. |


User-defined campaign objects | ||
| Use this object to start the path in your own campaign object. | No configuration is necessary for this object. |
| The ‘End Object’ makes it possible to stop a specific flow in a campaign for a specific customer or to direct them to another campaign. For more information, please read the explanation in the manual about 'user-defined objects'. | Give the end object a name so that you can use it as an exit for your user-defined object in another campaign. The name you give this object will be used as a user-defined exit in the campaign object. |
Channel Objects
| Icon | Function | Settings | Exit |
|---|---|---|---|
| This object makes it possible to link the flow to the ‘Callcenter’ campaign within a campaign. | This object is a user-defined campaign object that you can configure as you wish. Customers pass through this object and are exported to your customer service department at a specified time. In this campaign object, you can configure which fields you want to have exported and at what interval. |
|
| This object makes it possible to link the flow to the ‘Printer’ campaign within a campaign. | This object is a user-defined campaign object that you can configure as you wish. Customers pass through this object and are exported to your print queue at a specified time. In this campaign object, you can configure which fields you want to have exported and at what interval. |
|


Content Objects
| Icon | Function | Settings | Exit |
|---|---|---|---|
| The Page object makes it possible to display a webpage from Deployteq. | Give the object a name and select a Page. The manual explains how to create pages in the topic Webpages (Pages). Do you use manual fields on your pages? When selecting a page in the 'Show Page' campaign object, the default value of the manual field is displayed as a placeholder value (gray letters). The 'Show Page' object offers you the ability to:
|
|
| Use the ‘Send e-mail’ object to send an e-mail to one or more contacts. | Enter a name and select the e-mail you want to send. Choose from all the e-mails that have been created in the 'E-mail component' in Deployteq. If your e-mail contains a variable field (link to Variables), you could enter the value of this field here for this mailing. Use ‘Throttle speed’ to specify the maximum number of e-mails you want to send per hour. By ticking the ‘Send to a different e-mail address’ checkbox, you can send the e-mail to a different address. In this way, you can use this object to synchronize data. |
|
| The ‘Send SMS’ object can be used to send an SMS. | In this object, you specify what SMS content should be sent. You can specify whether the SMS should be sent to a different number. This is useful for test purposes or notification messages (e.g. when a new contact has subscribed). If ‘Premium SMS’ has been activated for the brand, ‘reverse billing’ can be configured. This can be used to charge a contact a certain rate for an SMS sent to the contact. |
|


Data model Objects
| Icon | Function | Settings | Exit |
|---|---|---|---|
| With the ‘Data Model Import’ object, you can first start an import and then follow the campaign flow. This ensures that you always have the correct data before you follow the campaign and can avoid empty e-mails. | When you use this object, you will go through the import wizard as you are used to doing. If an error occurs, you could, for instance, send an e-mail to yourself. When the ‘On success’ exit is chosen, the flow will continue with the records that have successfully been imported. |
|
| The ‘Get Data Model Record’ object selects a row from the data model. Only the contact selected from the flow is used as a source. This object examines all the contact’s data model rows and ignores rows that may previously have been selected from the flow. | In ‘Table’, you can specify which table to retrieve a row from. The columns in the table are made available as environment variables within the flow. The names of the variables are displayed in the overview. |
|
| This object can be used to iteratively start a separate flow for every record found. In other words, a flow is started for every row that is found. This allows you, for instance, to send an e-mail for every booking instead of sending an e-mail with several bookings to one person. | Specify the source: all contact data or only data from the current selection. In ‘Table’, you can specify the table for which a flow should be started for each record. |
|
| This object can be used to insert rows into the data model. | The contacts from the flow are used as a source. This object examines all the contact’s data model rows and ignores rows that may previously have been selected from the flow. In ‘Table’, you can specify the table in which to modify the rows. Once a table has been chosen, a value can be specified for each column. If you choose a table that hangs ‘underneath’ another table, you will first need to specify which row in that table should be chosen to add the underlying row to. |
|
| This object is used to retrieve a contact based on the data model. | The contacts from the flow are used as a source. This object examines all the contact’s data model rows and ignores rows that may previously have been selected from the flow. In ‘Table’, you can specify the table from which a row should be sought. The columns in the table are made available as environment variables within the flow. The names of the variables are displayed in the overview. |
|
| This object can be used to modify rows in the data model. | The contacts from the flow are used as a source. This object examines all the contact’s data model rows and ignores rows that may previously have been selected from the flow. In ‘Table’, you can specify the table in which to modify the rows. Select the column to be modified and the corresponding value, and then underneath the condition for selecting the row. |
|
| This object can be used to delete rows from the data model. | The contacts from the flow are used as a source. This object examines all the contact’s data model rows and ignores rows that may previously have been selected from the flow. In ‘Table’, you can specify the table from which to delete the rows. Filters can be used to select specific rows from that table. |
|
Flow Objects
| Icon | Function | Settings | Exit |
|---|---|---|---|
| The possibility to determine the next step in a flow based on whether or not a link has been clicked on. | When determining the next step to this object, you can exclude certain links in the e-mail (e.g. Continue on click, but not when the unsubscribe link has been clicked). Always set a timer because no one will have clicked immediately after the e-mail has been sent. It is also possible to determine the next step when a specific link has been clicked on. This is done by designating a tag in the e-mail links. |
|
| To determine whether one of more customers have opened (or not opened) the e-mail. | Follow up the openers or non-openers after a specified time (timer) based on a previously sent e-mail. For example, you could send a reminder e-mail to those who did not open the e-mail. |
|
| To determine whether an e-mail sent to one or more customers has bounced. | Possibility to include the bouncers, non-bouncers, or other type of bouncers in a follow-up step within the campaign after a specific amount of time. For example, you could create an export of the bouncers for your customer service department. |
|
| The ‘Apply Condition’ object sets a condition with which a fork in the path can be created. A group of contacts that fulfils the condition follows a different path from the group of contacts that does not fulfil the condition. Different follow-on objects can be defined for each of the two groups. | First give the condition a name. Then create one or more conditions by selecting a field. You can choose between a default customer field, a customer option field, a campaign field created during this campaign, or an environment field created during this campaign. Then choose the condition (e.g. ‘is equal to’ or ‘starts with’). Choose the context of the value: ‘fixed’ (a fixed value such as a number) or ‘environment’ (an environment field from this campaign). Finally, enter the value that the condition should compare with the chosen field. The value is case sensitive. In ‘Condition Criteria’, you can specify whether contacts should fulfil all conditions, or at least one of the conditions. |
|
| The 'In Profile' object essentially functions the same as the 'Apply Condition' object. However, it checks if someone meets the conditions set in a profile. It's important to specify when not to use it. The In Profile-object is not used to initiate a mailing. It does not select contacts within Deployteq. | You select the profile that someone needs to meet. This could be used, for instance, if someone completes a form (you have no control over the selection). You use the profile to check whether someone has placed an order in the past month and continue the flow based on the answer. |
|
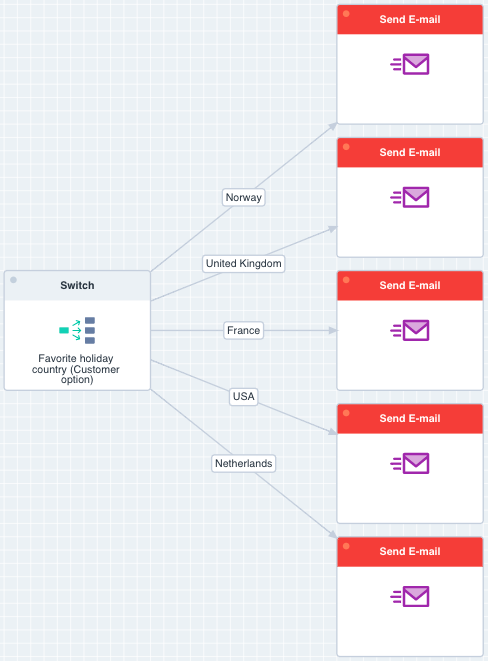
| The 'Switch' object allows you to split customer selections based on customer data. The functionality is similar to (several) linked 'Apply Conditions', however this object is much more efficient. |
Select the field you would like to use. You can use: Customer fields, Customer option fields, Campaign option fields and Environment fields. In the 'Value' column, enter the values you would like to use to split your customer selection. The should be values you can find in your Customer database (Screenshot Configuration). You can now create a link for each defined value. The 'Other' link will be used if the customer doesn't match with the given values (Screenshot in Campaign). |
|
| The ‘Link to campaign’ object is used to direct customers in the current campaign to another campaign. | Give the object a name. Select the campaign to which the contact should be added and specify with which ‘Start on Event’ the customer or customers should enter the campaign. For example, when someone has completed this campaign, they enter the next step of your customer journey. To prevent the campaign from getting too big, you can use this object to forward them to a new journey. |
|
| The ‘Split flow’ object is used to split a selection of contacts created previously into several directions. | First specify on what basis you want to split the contacts: 1. Split equally, 2. Split using a percentage, or 3. Split using a number. You can then enter the different flow names and configure the distribution. You will then see the flow names when linking the object to the next object. |
|
| The ‘Checkpoints’ are used for Deployteq Analytics. When someone reaches a certain point in the campaign, this is counted in the checkpoint. You can then use these figures in your Analytics dashboard. | Give the checkpoint a name so that you can find it in Analytics again. |
|
| The ‘Set timer’ object makes it possible to define a fixed time interval between different objects. A timer can be used, for example, to specify that an e-mail should be sent to a customer a day after the customer has subscribed. | Give the timer a name. You can then decide if you want to wait a specific number of days before the flow is continued or wait for a specific moment, e.g. wait until Monday or wait until 12:00 PM. If you choose a period, you must set an interval: minute, hour, day, week, or month. In ‘Offset’, enter the number of time units, e.g. wait 3 days. |
|
| This object ensures that e-mails are only sent within specific times or that only a specific number of customers receive an e-mail per day. This allows you to limit the burden on your customer service department or, for example, refrain from sending e-mails on a Sunday if that is not what customers want. | Specify how many customers are allowed to pass through this object per hour, day, week, or month. You can then specify the days on which e-mails may be sent. Finally, you can also specify times between which e-mails may be sent, so that, for instance, your customers are not sent e-mails in the middle of the night by an automated process. The ‘Continue’ exit will be used until the limit is reached. A signal is sent when the limit is reached and you can search for yourself via the ‘Limit has been reached’ exit to send yourself a notification e-mail. The customers who you can no longer send an e-mail to once the limit has been reached are directed through the ‘Past limit’ exit. These people can be placed in a group that is added to the flow again the next morning when the limit is reset. |
|


Customer Objects
| Icon | Function | Settings | Exit |
|---|---|---|---|
| The possibility to export records that have entered a specific flow in a campaign. For example, you could export all bounced records daily so that they can be followed up by your customer service department. Place a 'Bucket' object in front so that you can collect the customers first before exporting them, otherwise an export will be performed per customer. | Similar to when exporting data in the export module, you can then choose the fields that you wish to export and the location where you want to save the file. |
|
| This campaign object is used to configure an import as you are used to doing, but now the campaign will only continue once the import has finished. This object imports customers and select these customers within the campaign. Use the data model objects to perform a data model import. You can also use these objects in succession. | This object takes you to Deployteq’s import wizard. |
|
| This object can be used to unsubscribe customers from a campaign, all e-mail messages, and/or SMS messages. | You can unsubscribe a customer for:
|
|
| This object can be used to modify customer data. This may be done in response to a customer action (e.g. clicking in an e-mail updates a field) or to add environment fields (e.g. a temporary value from an API call) to your contact database. | First give the object a name. Choose the field to which the new data should be added. Choose the ‘Fixed’ context value option, enter the value or environment (the value from this environment field), and select the environment field. These values will be added to the selected database field for all customers that go through this object. |
|
| This object is used to identify a contact based on specific customer fields. The object searches your contact database for contacts that meet your specified criteria. | Give the object a name. Then select a customer field or customer option field from the list of fields. Now select an environment field in the drop-down menu. The data from the customer database is now compared with the data from the environment field. You can specify multiple conditions. |
|
 | This object is used to add a contact to the contact database or modify the data of an existing contact. Similar to the ‘Add customer’ object, it is possible to add customers that enter a campaign via a ‘Start on Event’ or ‘Start on SMS’ to the database. However, this object immediately assesses whether it is a new or existing customer record. It is also possible to deduplicate on the basis of one or more fields to prevent a contact from being included in the database several times. | In ‘System field’, you choose which Deployteq field you want to update and in ‘Context value’ you specify whether this value should be a fixed value or an environment value. Tick ‘Unique’ for the field on which deduplication should be based so that a check is made to see whether that field already exists in the database. |
|
| The ‘Add customer’ object is used to add a contact to the contact database. Under normal circumstances, contacts are added to the database by means of an import or subscription form. It is also possible to add contacts, which enter a campaign via a ‘Start on Event’ or ‘Start on SMS’ object, to the database. No deduplication will take place, but you can use the ‘Find customer’ object to check whether a contact already appears in the database. On this basis, appropriate follow-up actions can be carried out. The default (e-mail) Opt-in value is ‘Yes’, while the default (SMS) Opt-in value is ‘No’. | Give the object a name. You then specify which (environment) variables should be saved in which customer fields. You can, for example, save an e-mail address from a URL parameter in a customer field belonging to this new record. It is a good idea to place a ‘Find customer’ object in front so that you only add customers that do not yet exist and only modify other customers. |
|
| The ‘Remove customer’ object can be used to delete a contact from the database. This is useful if you only want to keep a contact in your database temporarily (e.g. for Forward-to-a-friend campaigns). This action cannot be undone. By default, this object deletes customers in a single customer flow only. In the settings you can choose to delete several customers simultaneously. | Tick a checkbox in the object settings to allow multiple customers to be deleted simultaneously. |
|
| This object is used to select a group of contacts based on the current campaign, profile, or group. The group that is selected proceeds to the next step in the campaign. | Enter a name for the object. Then choose whether you want the selection to be made on the basis of the current campaign, a group, or a profile. If you opt for a group or profile, select the desired group or profile in the file manager. You can choose from all groups and profiles that were created in the 'Profiles' and 'Groups' components in Deployteq. In the CRM, you can make contacts members of a campaign, such as for an import. |
|
| This object can be used to add selected contacts to a group in the campaign. | Give the object a name and select the group to which the contacts should be added. You can choose from all existing groups. You can also choose to create a new subgroup of the chosen group. Check the box for ‘Create new group’. Here you can also use variables such as ‘$smarty.now’ or ‘manual field’. |
|
| You can delete selected contacts from a group in the campaign. | Give the object a name and select the group from which the contacts should be deleted. You can choose from all existing groups. |
|
| With this object, it is efficient and easy to set up to compare the current customers in a group with the customer selection of the campaign flow every time the campaign runs, and to update all differences. If a group customer is not present in the incoming selection, they are removed from the group, and if a selected customer is not present in the group, they are added. | Use this object to easily capture the customer selection in a campaign and store it in a group. After dragging the object into your campaign, you can customize its name. Then, you select the desired group to be synchronized. You can choose from all groups created in the 'Groups' section of Deployteq. The object before the 'Sync to Group' object in the campaign flow should be the 'Select customers' object. With this object, you select a group of relationships based on the current campaign, profile, or group. The group selected moves on to the Sync with Group step. |
|
| Encrypt customer data so that it can be used securely, such as in a URL. This enables you to follow a customer, prefill forms, or create a soft login. | Specify the fields that you want to encrypt and then the encryption method you want to use underneath. All encryption options can be found on a seperate page in this manual. |
|


Environment Objects
| Icon | Function | Settings | Exit |
|---|---|---|---|
| Global Environment This object makes it possible to insert temporary variables throughout the path, which only apply inside the campaign. This object can be used, for instance, as a counter within a path. | First give the object a name. For the field name, select an existing environment field or enter a new name to create a new field. In ‘Field Option’, select the type of action. Then define the field value, such as ‘Counter’ (field name) ‘increase by’ (field option) ‘1’ (field value). The object will now ensure that the counter is increased by 1 for every contact that passes the object. Elsewhere on the path, the counter can be reused in a condition, e.g. ‘Counter’ (field) ‘is’ (condition) ‘500’ (fixed value). The contact that makes the counter tick over to 500 fulfils this condition. |
|
| Private Environment The ‘Private Environment’ object is virtually similar to the ‘Global Environment’ object. The difference is that ‘Private Environment’ only applies to active users. It allows you to define variables at individual level that you can reuse further on in a campaign path to link conditions, for example, or to save specific values to customer records. | In a private environment, you can also first give the field a name. You then specify what you want to do with this field. Again, you can enter a value, increase or decrease, or enter a value before or after. However, in a private environment, this will be a personal value. Whereas a counter is used for the entire campaign in the global environment, here you can count how many times a person has passed through a specific flow. For example, a person is allowed to receive a reminder twice. You increase the counter to 1 after sending the first reminder and then increase by 1 again after the second reminder. The condition then checks whether the counter is greater than 1. If it isn’t, the customer is allowed to receive another reminder and if it is, the customer will leave the flow. The customers who are in the flow can all have a different value in their private counter. |
|

Other Objects
| Icon | Function | Settings | Exit |
|---|---|---|---|
 | Bucket This is used to collect customer records in a campaign flow and is often used to export customers in the campaign flow. In this way, you don’t have to create an export for each customer who goes through the flow. | You configure the threshold value based on a specific period of time or number. The customer records are collected until the threshold value is reached, e.g. you collect the participants until a specific number is reached. When the threshold value has been reached, you can take follow-up steps, such as sending a bundled e-mail or sending an export to the customer service department. |
|
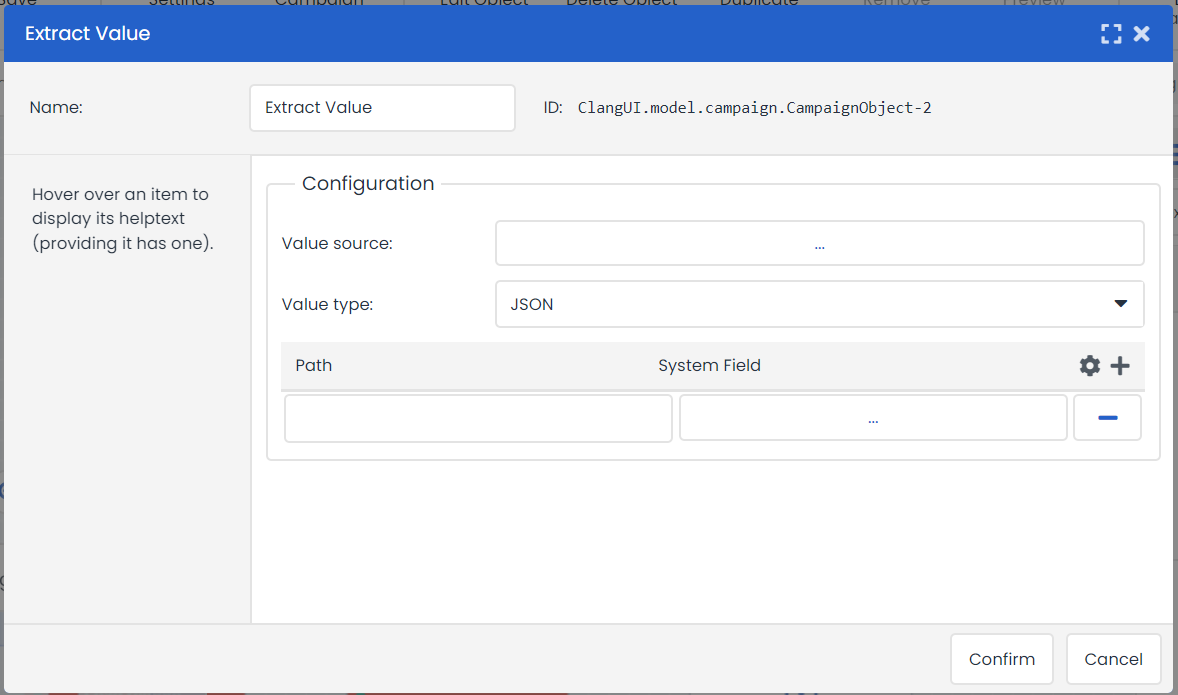
| Extract Value When you have JSON code in an environment variable or customer field, this is normally read out as text, which means that you cannot do much with the values in your JSON code. This object can be used to save the values in your code as separate elements in a field or as a separate environment variable. | Specify where the code is saved; the type has always been JSON up to now. Then specify the path where the value that you want to use can be found, e.g. order.orderNumber and specify where you want to extract it to under ‘System field’.
|
|
| Landing Page This object makes it possible to direct users to an external page, e.g. a page on your website, based on a specified URL. You have the option to use GET variables to enclose customer data in the URL of the external page. | Give the object a name. Then specify the URL to be used. If desired, you can set (GET) variables to include customer data in the URL. |
|
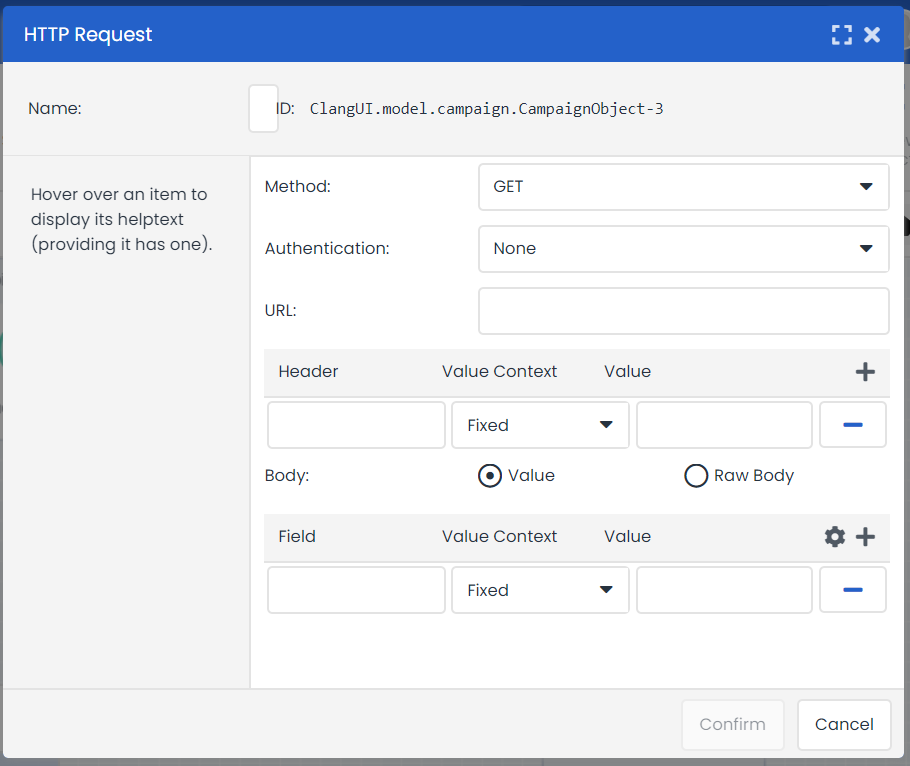
| HTTP request The 'HTTP Request' object allows you to communicate activities to external systems or retrieve data from external APIs. Sending Data
Retrieving Data Response Data | To configure this object you can follow these steps:
|
|
| Set Error You can enter an error message in the campaign. This is used, for instance, for a login process when the authentication fails. | Give the object a name. Enter a text to be displayed as the error message. This can then be displayed on your page using the Smarty code {{error}}. |
|
| Confirm Relation The ‘Confirm Relation’ object confirms the relationship between two persons, brought about, for example, by a Forward-to-a-friend form. This confirmation follows automatically when, in the case of the Forward-to-a-friend form, the e-mail sent to the subscribed friend is clicked on. | No configuration is necessary for this object |
|
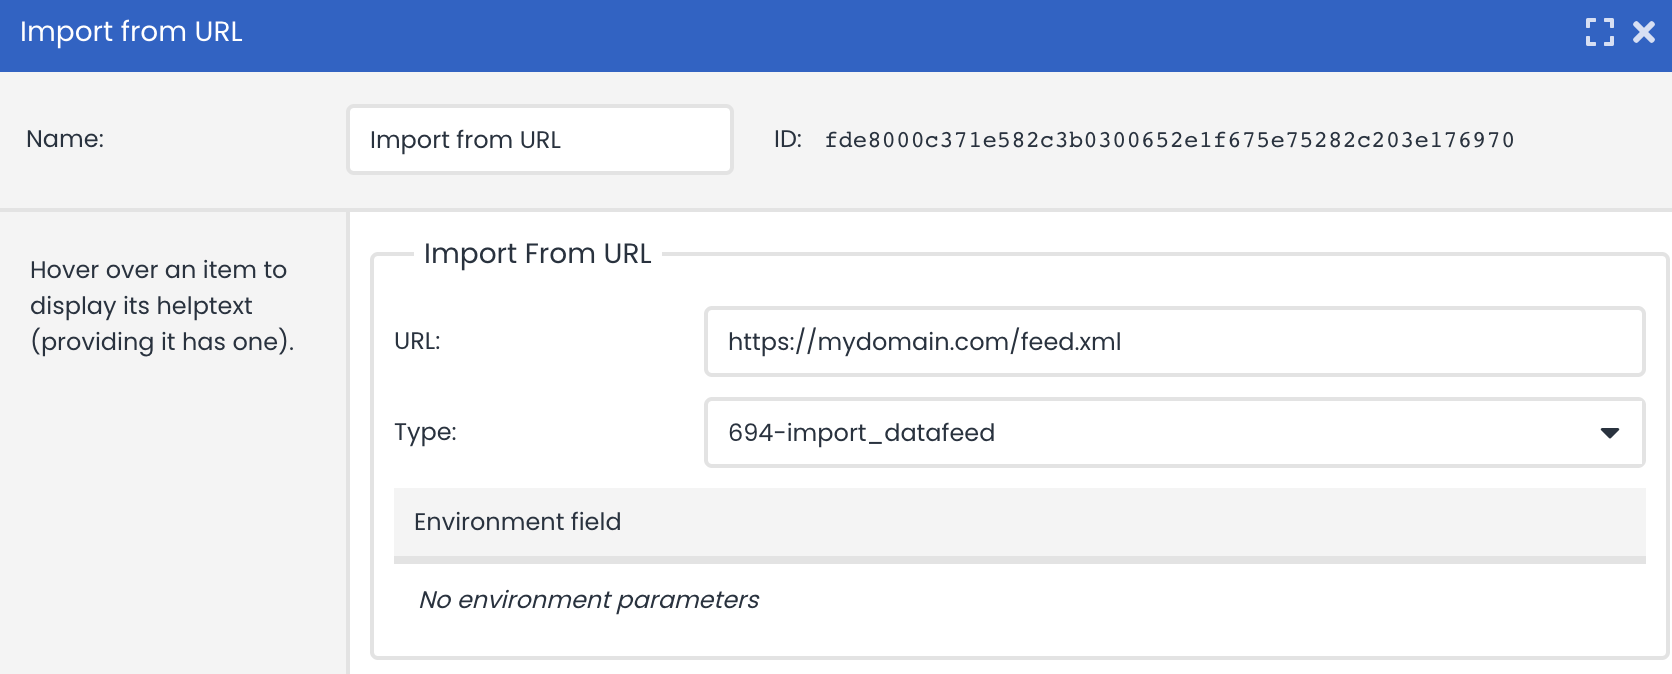
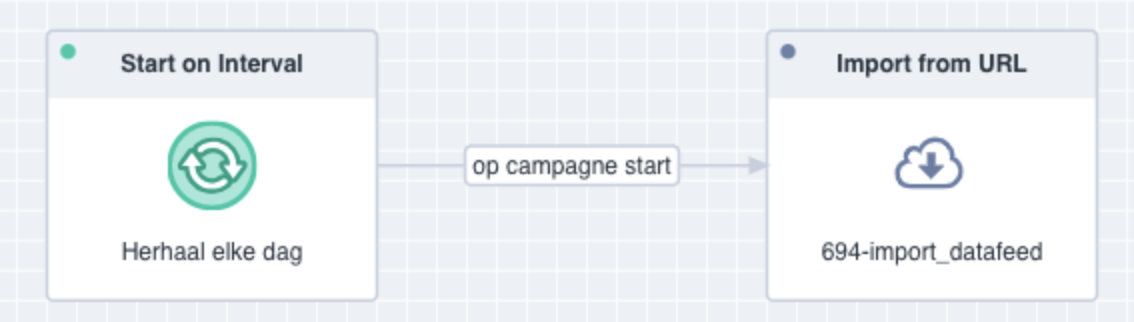
| Import From URL When the webhook is configured in the store, the "Import from URL" object becomes available. With this object, you can retrieve and process an XML, RSS, or JSON feed through a webhook into the datamodel. This object allows you to, for example, store a product feed in the data model so that it can be easily used in your content. Because this data is stored in the datamodel, you also benefit from the maximum delivery speed compared to the solution where a feed is fetched when rendering an email (Datafeeds app). The only downside of this object is that you can't use a personalised feed. | In the object, you can specify the URL of the feed and the webhook that should process the data. After the feed is initially retrieved and provided to the webhook, the data can be linked or associated.
* This object can only handle fixed URLs; dynamic url's with personal information isn't possible.
|


