It is possible to export the customers who you have in Deployteq to your other systems. For example, you could select the modified data in a campaign or the opt-in and bounce data that Deployteq keeps track of for you. As with an import, you can configure which customers to export, what data to include in your file, and whether you want to run the export automatically on a periodic basis. Below are the options that you can configure via the export wizard.
What data can I export?
You can indicate what you want to export when you start the export wizard. Do you only want to export the people who participated in a specific campaign, everyone in your newsletter group, or everyone who is stored in Deployteq?
- Everyone:
You want to export the data of all contacts in the CRM. - Campaign:
You want to export everyone who is or has been involved in a specific campaign. Select this option and click on ‘Next’ to see a screen where you can select the campaign. - Profile:
You only want to export contacts based on certain conditions. To do so, you can create a profile and export the contacts into that profile. Select ‘Profile’ and click on ‘Next’ to see a screen where you can select your profile. When the export takes place, the profile will be calculated and the customers currently included in your profile will be exported. - Group:
You only want to select contacts that fall within a certain group, such as your newsletter subscriptions. Select ‘Group’ to see a screen displaying the group diagram. When the export takes place, the customers who fall within that group are exported. - Copy a previous export:
You want to perform an export with the settings of an export that was performed earlier. Select the option ‘Copy a previous export’ and click on ‘Next’. You’ll now see a list of all exports that have been performed. Select the required export from the list. Then complete the wizard, as you would do for a new import, which means that you will be able to make changes to the settings.
Incremental export:
In order to use the settings of a previous export, but only export those contacts not exported during the previous export (i.e. new or modified customers), select the ‘Incremental’ option. In the next screen, select the export for which you want to receive the modified customers. Again, it is possible to make changes to the fields or the name of the export here. This does not create a new export with all the customers who were previously exported with the ‘old’ settings.
Select your fields
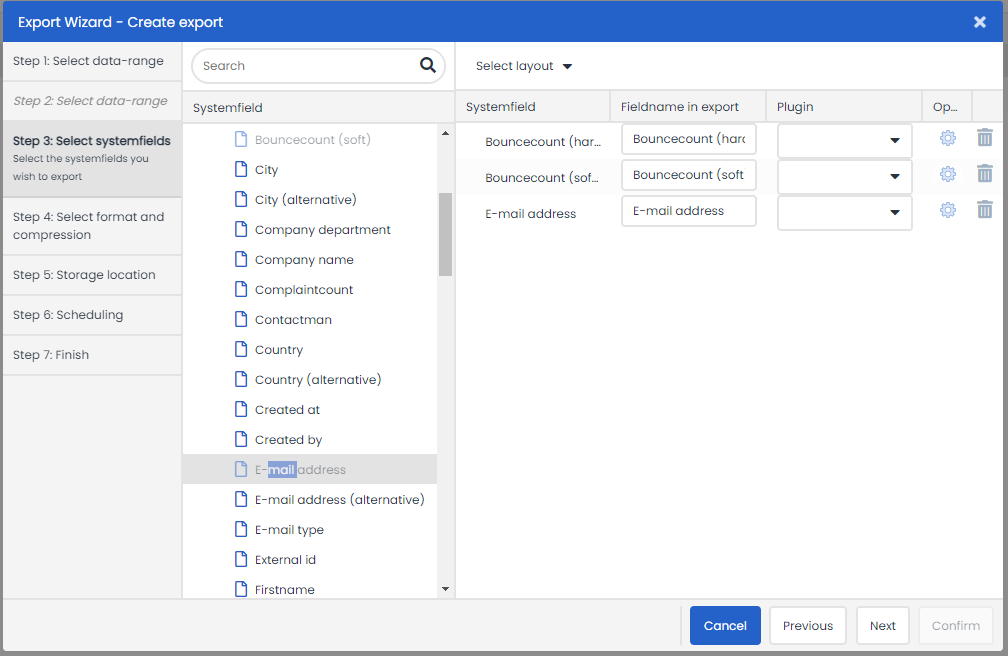
In the step ‘Select system fields’, specify which fields you would like to export from the database and which column heads you would like to use. The list on the left contains all the fields you can use – the standard system fields in Deployteq as well as the customer option fields and the groups. The value in the column of a group indicates whether a person belongs (1) or does not belong (0) to the group. If you have chosen a campaign, you can also export the campaign fields for that campaign.
Double-click on a field to display it on the right-hand side. Here you first see the system field from Deployteq and next to it you can change the column head to a name that you usually use in your organization. You can then configure a plug-in, which ensures, for example, that a first name always starts with a capital letter. If you decide not to use a field in your export, just click on the recycle bin after the field.

Converting data with plug-ins
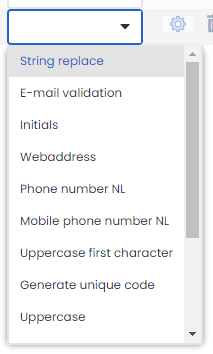
Plug-ins can be used to tailor data even better to your needs. The drop-down menu behind the field displays the plug-ins that apply to the field. The ‘Replace string’ plug-in is always one of the options. This plug-in replaces part of the text in the field with different text. Select the ‘Replace string’ option in the drop-down menu. You will see two fields that you can fill in – ‘Search’ which is the value you wish to replace, followed by ‘Replace’ underneath where you enter the new value.
The other plug-ins are virtually the same as for the import, where we have explained them all for you in this manual.
File settings
In the next step, you can determine what your file should look like. First of all, you can choose the file type. Choose from CSV, XML, and Fixed Length. CSV is most often used here, but your system may require a different format. You then specify the character set, which is configured to the most commonly used set by default: UTF-8. This, too, depends on the system in which you wish to process the file.
CSV format

If you choose the CSV file type, you will see several additional options for formatting your file under ‘CSV settings’.
Delimiter:
First of all, select your delimiter (comma, semicolon, vertical bar, etc.) This sign separates the fields.
Text indicator:
The text indicator is placed in front of and behind the data in a field. This is important, for example, if spaces occur in the text. It will then be seen in the import as a value for one field.
Add column header:
If this option is enabled, the field names will appear in the first line of the export file. The data starts on the second line. If you do not check this option, the data will immediately start on the first line.
XML format
If you want to export the file in XML format, no additional settings are needed.
Fixed length format
The third file format you can choose is the Fixed Length format. If you choose this format, you will see the option to set a length for the fields.

Field length:
Here you specify how long the field should be. Specify the number of characters that each field should be able to contain behind that field.
File compression:
The last option you see is to compress/package the export file. Here you can choose between a ZIP or a RAR file.
Location
When you have configured these details, you can select an export location via the file manager. If you want to place the file on an external SFTP server, you can add it to the file manager.
Schedule export
Specify in the schedule when you want the export to take place. Start the export immediately or specify a date and time.
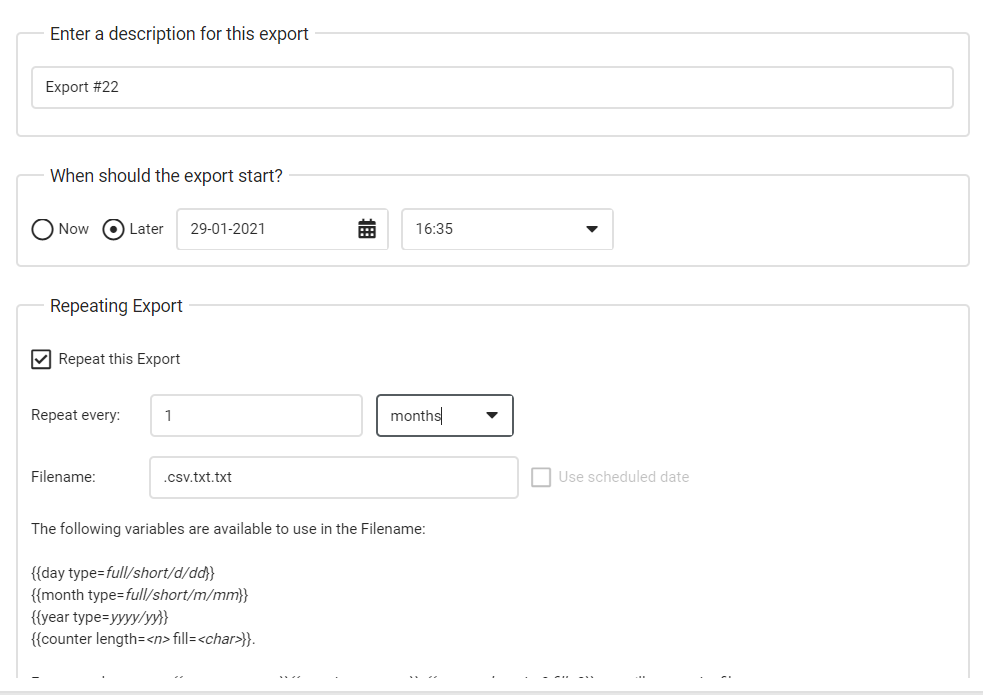
Repeat export:
Check the ‘Repeat export’ option to see the relevant settings. Select hours, days, weeks, or months and specify a number. You must also provide a filename and can use variables to avoid the same file being overwritten by the export every time.
The following variables are available:
{{day type=full/short/d/dd}}; {{month type=full/short/m/mm}}; {{year type=yyyy/yy}}; {{counter length=<n> fill=<char>}}.
Use scheduled date:
The ‘Use scheduled date’ checkbox becomes active when the filename contains date variables ({{day type=full/short/d/dd}}, {{month type=full/short/m/mm}},{{year type=yyyy/yy}}). The start date is used by default. If the ‘Use scheduled date’ checkbox is ticked, the day on which the export is scheduled will be used.
Notification after export
You can be sent notification of an export that is complete. This message contains the numbers of exported customers as well as information about any problems that might have occurred, such as the inability to establish a connection with the SFTP server. Check the ‘Notification’ option and enter the e-mail address you want to use for receiving the messages.