Profiles are an ideal way to segment customers within Deployteq. By associating conditions to a segment, you can select the precise customers who you want to reach. Who has subscribed to the promotional newsletter? Whose birthday is it next week? Who has placed at least two orders over the past year? We will explain to you how to obtain the answers to these questions in Deployteq.
You can access the Deployteq component ‘Profiles’ via the menu. Of course, our manual provides you with a lengthy explanation about profiles and the options that you can select but there are many possibilities. The best tip that we can give you is to create a new profile and ask Deployteq a lot of questions. As long as you are working in a new profile, you cannot ‘break’ anything and can check via the CRM whether the customers in your profile are the correct ones.
You create conditions within profiles which your customers must satisfy. Conditions can be based on standard customer fields, customer option fields, campaign fields, as well as groups, whether someone was included in a specific import, or the values in the datamodel.
Profile conditions
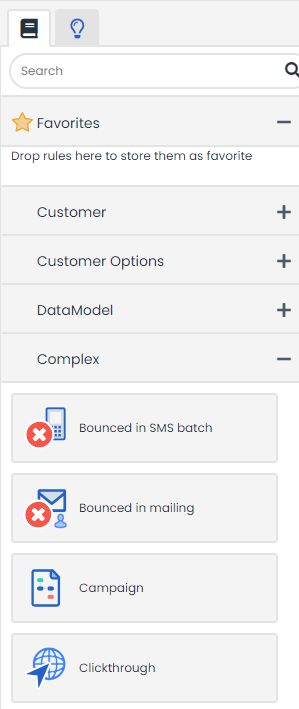
The library on the right of the page contains profile conditions listed under the various menu items.
- Favourites:
Save conditions that you often use in your profiles to your favourites. The settings that you use for these conditions will also be saved automatically. If you have groups for the newsletter segment, for example, formulate the condition ‘is a member of group X’ and drag the configured condition to your favourites. It will then appear configured at the top of your library.
- Customer fields:
These are standard customer fields containing personal data, such as e-mail address, date of birth, and town/city.
- Customer options:
These are the customer option fields that you configured in this brand.
- Campaign options:
The fields you configured in your campaigns are shown here. The campaign names appear in bold, with the field used in the campaign underneath.
- Data model:
This contains all fields that have been created in your data model. The table is displayed in bold and the field is shown underneath. There could be many of them if the data model is large. You can also search for the table name that you need.
- Complex:
Here you’ll find conditions based, for example, on groups, campaigns, clicks, imports, or other created profiles.
- Optional conditions:
Here you’ll find custom conditions if used in your Deployteq brand.
Settings in the conditions
You can use specific settings for each condition. The settings that are displayed depend on the field type. For example, you can perform calculations with dates and numbers, but you can also search within alphanumeric fields to see whether your search is a precise match, or starts or ends with the same string. Below are the most common settings.
String conditions
String conditions help you to search within alphanumeric fields.
- Is/Is not:
This setting checks whether a field has precisely this value or not. It is not case sensitive. - Starts with/Does not start with:
This condition checks whether the start of the text contains the search term. - Ends with/Does not end with:
This condition checks whether the last part of the text contains the search term. - Contains/Does not contain:
This condition looks in all parts of the text to see whether it contains the specified characters. As this is a very general search query and the characters could be anywhere, it can slow down the calculation of your profile. - Smaller than/Bigger than:
This condition looks at the alphabetical order of the characters in the text field. ‘Bigger’ means further along the alphabet. - Empty/Not empty:
This condition looks at whether the text field contains information and selects all records where the text field is empty or not empty. - One of/Not one of:
When you have several conditions for a string, you could use this option where you would normally use several blocks with OR. For example, where the country is NL or BE or the Netherlands or Belgium, then use the ‘Is one of’ condition. If you are using many different names here, use the gear icon to copy and paste these names, separated by Enter.
Date condition
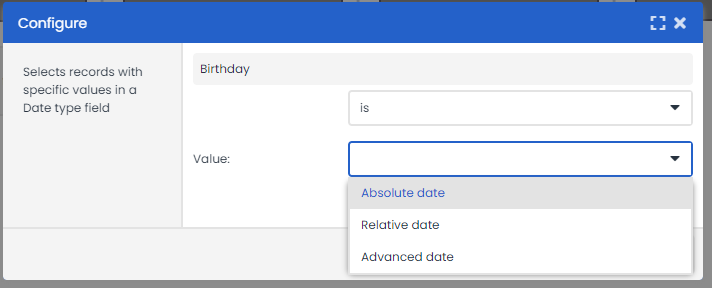
When you choose to use a condition based on a date (e.g. made on, date of birth, or creation date), you can perform calculations with this date. There are three options available for use:
- Absolute date:
Here you choose a fixed date. This is often used for a one-time send-out, e.g. you want to send everyone who attended an event on date X a one-time questionnaire about this event. - Relative date:
This will mainly be used for automatic campaigns and allows you to perform calculations with the date. For example, you perform a daily check to see who subscribed seven days previously so that you can send them a welcome e-mail. You can also choose to ignore the year. This is useful if you want to know whose birthday it is today. In that case, the year of birth is not relevant. - Advanced date:
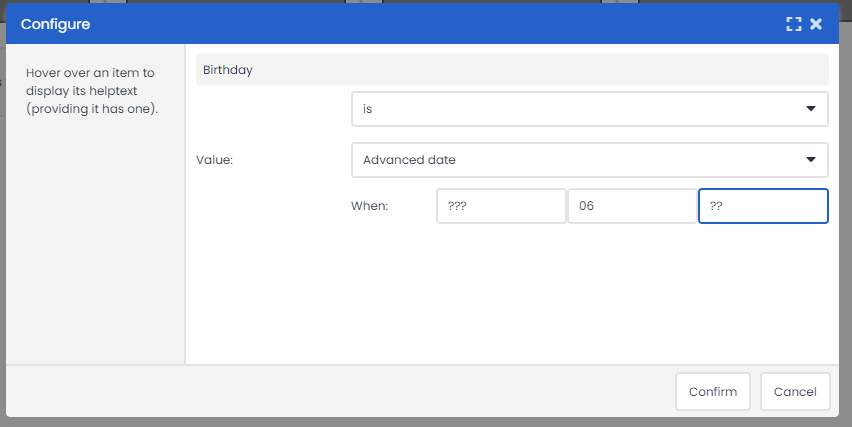
You can also perform calculations with this option, but you can also use wild cards by inserting a question mark (?) in the fields. For example, the day and year are not relevant but you want to select everyone whose birthday is in June. If the date is entered with Year Month Day, the setting will be ???? 06 ??

Numeric conditions
The numeric values consist of integers and decimal values. These numeric conditions can also be used to perform calculations. For example, if you are keeping track of the total revenue for each customer, you can draw special attention to customers who have generated a revenue of more than 250 euros as regular customers. Or designate customers who have generated more than 250 euros but less than 500 euros in revenue as ‘silver’ customers and those who have generated more than 500 euros in revenue as ‘gold’ customers.
- Is/Is not:
This setting checks whether a field has precisely this value or not. - Smaller than/Bigger than:
This setting selects everything that is bigger or smaller than a certain value. The value itself does not count so if you set the condition ‘Bigger than 1’ you will retrieve everyone with a value of 2 or higher. If you place the same condition underneath, you can retrieve intermediate values. So if the number should be ‘Bigger than 1’ AND ‘Smaller than 5’ you will retrieve everyone with a value of 2, 3, or 4. - Empty/Not empty:
This setting checks whether a field has a value or not.
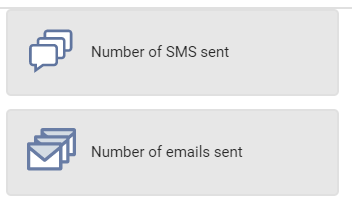
E-mail load condition
You don’t want your customers to receive so many e-mails that they will unsubscribe. However, with all the automatic campaigns, newsletters, and promotional mailings, as well as communications sometimes sent out by other departments, this is difficult to manage at times. There are two objects available in the profile editor that enable Deployteq to take this over from you automatically. The conditions are called ‘Number of e-mails sent’ and ‘Number of SMS messages sent’.
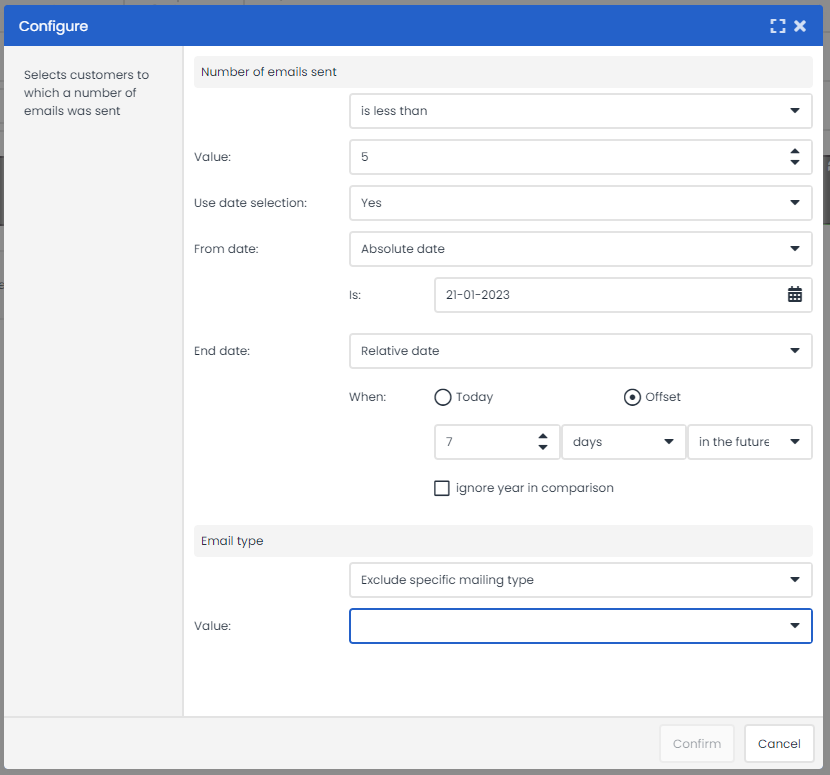
These conditions can be configured so that you can indicate whether or not you want to send an e-mail to someone based on a date and mailing type. In the example below, you can see that someone should have received fewer than five e-mails in the past seven days. We exclude the ‘system e-mail’ mailing type as these mailings are allowed to continue.
If you also want to use this condition in your automatically triggered campaign, use the 'In profile' condition object and select the profile in which you configured this profile condition. This allows you to curb the number of automatically triggered (commercial) mailings that your customers receive.
Complex conditions
Complex conditions are used to select contacts in profiles based on special characteristics, such as those that belong to a group or campaign, or those that appear in an import or export history. The following complex conditions are available:
- SMSable:
This condition retrieves contacts that can be reached by SMS. The SMS opt-in must be set to ‘Yes’, a mobile number must be entered, and the civil status must not be ‘deceased’. - Campaign:
This condition selects contacts that are members of a specific campaign. Select ‘Member of’ or ‘Not member of’ from the drop-down menu. Then click on the ‘Campaign’ button and select the desired campaign from the tree diagram. - Clickthrough:
This condition selects contacts that have clicked on a specific link. Select ‘Clicked’ or ‘Not clicked’ from the drop-down menu and choose the type of mailing from the ‘type’ menu. You will then see the entire list of QuickMails or CampaignMails which can be quite long, so if you know what the e-mail is called or when it was sent, this can help you with your search. - Export history:
This condition selects contacts that appear in a specific export. Select the desired export from the list and click on ‘Confirm’. Again, it helps if the exports are given a clear name or you know exactly what it is called. - Received e-mail:
This condition selects contacts that have received a certain e-mail. Choose ‘Received’ or ‘Not received’ from the drop-down menu and select the type of mailing from the ‘type’ menu. You can also choose to select all e-mails within a specific campaign. This could be useful, for example, if you send several versions of the same e-mail via the campaign. - Bounced in SMS batch:
This condition selects contacts that have bounced in a specific QuickSMS or CampaignSMS send-out. - Bounced in mailing:
This condition selects the bounces of a specific mailing. - Opened e-mail:
This condition selects contacts that have opened a certain e-mail. Select ‘Opened’ or ‘Not opened’ from the drop-down menu and choose the type of mailing from the ‘type’ menu. - Group:
This condition selects contacts that are members of a specific group. Select ‘Member of’ or ‘Not member of’ from the drop-down menu. Click on the ‘Group’ button and select the group from the tree diagram. You can specify start and end dates if you only want those people who joined the group within a specific time period. - Received SMS:
This condition selects contacts that have received a QuickSMS or CampaignSMS. - Import history:
This condition selects contacts that appear in a specific import. Select the desired import from the list and click on ‘Confirm’. Again, it helps if the imports are given a clear name or you know exactly what it is called. - In profile:
These conditions allow you to add other conditions from an existing profile to your profile. In this way, you ‘stack’ your conditions and can place frequently used conditions in a standard profile for use in your other profiles. Select ‘Member of’ or ‘Not member of’ from the drop-down menu and click on the browse button to choose a profile. - Mailable:
This condition uses several properties to select contacts. It first looks at the bounce count (hard and soft) to check that they have not yet been reached. It then checks that the civil status is not ‘deceased’, that the status is not set to ‘blacklist’, that an e-mail address has been entered, and that the opt-in value is set to ‘yes’. The record is only ‘mailable’ when ALL conditions have been met. The opposite conditions apply, of course, for the condition ‘Is not mailable’. Deployteq ALWAYS uses this condition when sending out e-mails. It is not mandatory to add this condition to your profile but it does enable you to see how many people will be sent an e-mail.
If you do not use this condition, the numbers may differ between your send profile and the total number of e-mails sent. - Deduplication:
Use this condition to deduplicate on the basis of e-mail addresses. If multiple records with the same e-mail address exist, the customer record with the most recent modification date will be chosen and you will prevent people from receiving duplicate e-mails. - Received block:
With legacy e-mails or older SMS messages, it is possible to work with block variations. This profile condition enables you to make a selection within your send profile so that you can determine for whom a specific block is or is not shown. - Tag:
This condition selects contacts that have a specific tag. Select ‘Is’ or ‘Is not’ from the drop-down menu and choose a tag from the corresponding drop-down menu. All tags present in the brand are available for this condition. - Tag weight:
It is possible to select contacts within a specific timeframe according to percentage-based, static, or top-scoring values. This ensures that you send e-mails to people who have actually clicked on a link and been assigned a specific tag on more than one occasion and allows you to make the assumption that they would therefore be interested. Again, you select the desired tag from the drop-down menu. You then choose the comparison that you want (static number, percentage-based, or top-scoring value). Afterwards, you choose the type of comparison you want (is, is not, is bigger than, is smaller than) and then the value. It is also possible to specify the required time period so that you only make comparisons in recent data and thus select recent interests. - Unsubscribed from campaign:
This condition selects the contacts that have unsubscribed, or not, from a certain campaign. Choose ‘Unsubscribed from’ or ‘Not unsubscribed from’ and click on the ‘Campaign’ button. Select the campaign from the tree diagram. Specify a start and end date if you want to search within a specific period. - Unsubscribed from group:
This condition selects the contacts that have unsubscribed, or not, from a certain group. Select ‘Unsubscribed from’ or ‘Not unsubscribed from’ in the drop-down menu. Click on the ‘Group’ button and select the group from the tree diagram. - Random:
This condition selects a random number of records from your database.
Combining conditions
As you will have noticed, you can drag multiple conditions to different columns or place them underneath one another in a column. The conditions are then linked to one another. Sometimes, however, you do not want someone to satisfy all of the conditions. In an earlier example, you saw that the ‘Country’ field can be filled with either ‘The Netherlands’ or, unintentionally, with ‘NL’. You do not want a person to have both ‘The Netherlands’ AND ‘NL’ in the same field but rather ‘The Netherlands’ OR ‘NL’. This can be modified in the lines that link the conditions together. The different operators that can be used are as follows:
- ‘AND’
A person must satisfy more than one condition. For example, a person must have their birthday tomorrow AND be female AND be mailable. - ‘OR’
A person must have ‘The Netherlands’ OR ‘NL’ in their country field. - ‘NOT’
A person must have their birthday today but NOT have placed an order in the past week. If you want to exclude more than one condition, you can specify in a column that a person must NOT have placed an order AND must not have their birthday tomorrow.
You can therefore combine various operators with one another in a column but always check to see whether the process is logical. If you use NOT at the top and there are several possible exceptions, use AND in the conditions that follow. Click on the connector shape to change the operator.
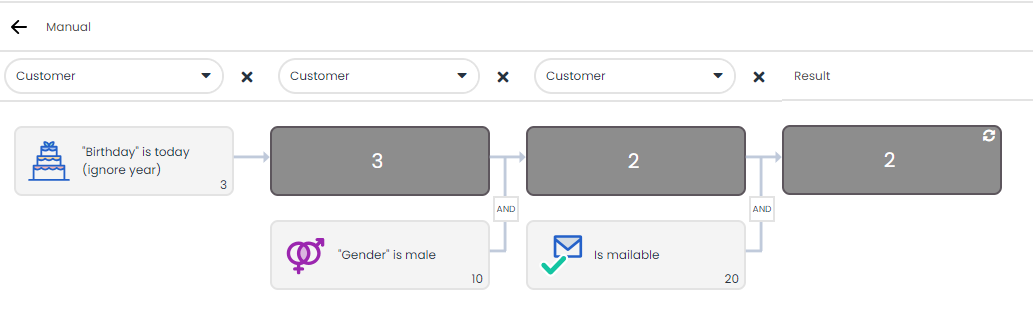
If you are combining two conditions with the ‘AND’ rule, your contacts will have to satisfy both.

It is also possible to use a ‘NOT’ condition to exclude specific values. In the example below, you want to select all the men in your database who do not live in Amsterdam.

Calculating profiles

The profile is calculated per column and the result of each column is displayed in the dark blue block.
Saving and calculating a profile selection, adding it to a group or campaign, and sending e-mails from the profile

Once you have entered conditions, you can calculate how many contacts in your database conform to this profile. To do so, click on ‘Actions’ in the menu and then on ‘Calculate profile’. Alongside the conditions, you can now see how many contacts comply with these conditions and, alongside the result, how many contacts comply with the combination of conditions. The latter number indicates how many contacts you reach when using this profile. It is possible to add contacts, which conform to the conditions of a certain profile, to a group or campaign.
Profiles using data from your data model
Profiles contain profile conditions for the columns in the data model. Once you have added a profile condition, choose the context at the top of the relevant column. Of course, you will select customer records, but you might also be looking for specific properties of an order. By specifying a context, you can also include the selected orders from the profile in e-mails that are created, so that you only receive the records for each contact in which he or she complied with the profile.
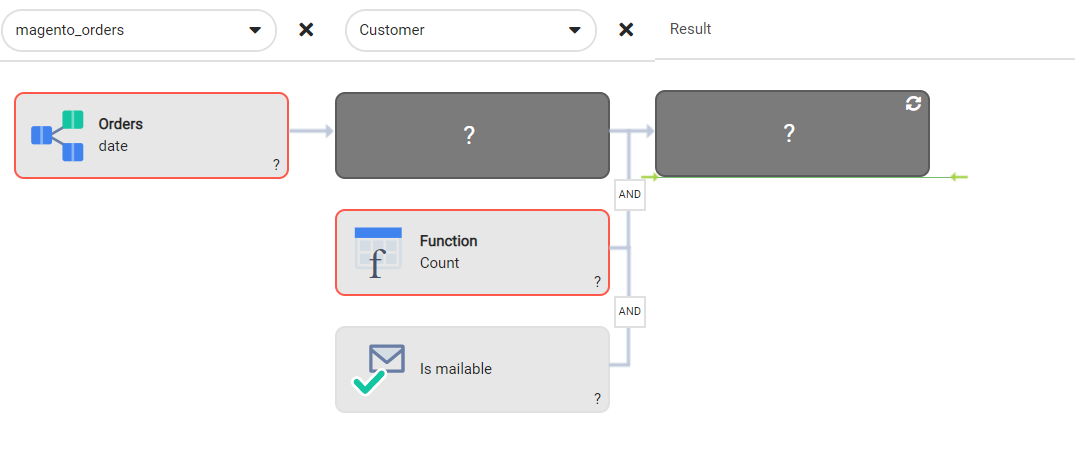
Through the creative use of the AND and NOT operators, you can send an e-mail about an upsell to people who have purchased a product, but not the accompanying product, in an order. In the example below, everyone is selected who placed an order for a coat at one point in the past, but never a scarf, in the past three months.
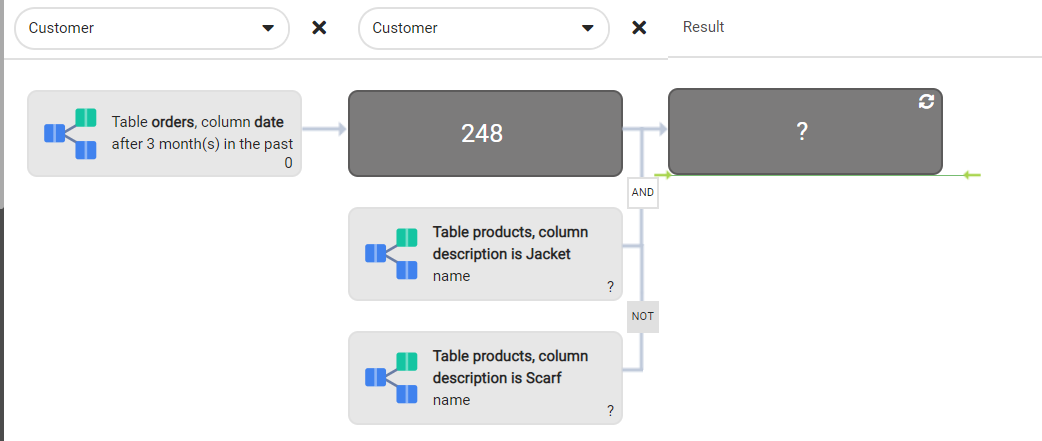
You can also see the orders in the profile as you not only want to use the customers but also the corresponding orders in an e-mail. At the top, you can change the context from ‘Customer’ to the table you are using for your search. This allows you to see not only the number of customers but also the number of orders.
If you perform a search in Table 1 and Table 2, place them in different columns so that you can change the context to the relevant table.
In addition to the values in the tables, we have function conditions that allow you to add, count, or calculate the average of results within the data model. This is only possible if you have already performed a data model calculation in the result of a previous column:
- ‘Quantity’ function:
This condition calculates the number of lines from the chosen data field in your model. To use it, select the required data field from the drop-down menu and configure your equation, e.g. the number of order lines in the orders that you have selected. - ‘Average’ function:
This condition calculates the average from the chosen data field in your data model, e.g. of all the orders selected, you only want customers with an average order value of 500 euros or higher. - ‘Sum’ function:
This condition makes it possible to perform calculations using data from your chosen data field in your data model. Select the required data field from the drop-down menu and configure your equation, e.g. of all the orders selected, you only want customers with a total order value of 1,500 euros.
Turning off profile rules
When you are performing tests, it may sometimes be useful to turn off some profile rules temporarily. Move your mouse over the condition and click on the checkmark that appears in the top left.
Examples
A commonly used example is the birthday profile; you can select everyone who has their birthday tomorrow to send them a personalized congratulatory letter, including, for instance, a discount code. Additionally, you may want to further segment the congratulation by selecting either women or men, so that the congratulations are sent in a segmented manner.
This profile is created as follows:
- Click on the ‘Profiles’ component in the navigation bar on the left and browse to the folder where you want to save the new profile.
- Click on ‘New’ and then choose ‘Profile’
(It is also possible to create a new folder here.) - Give the new profile a name. Make sure to use a clear, descriptive, and methodical naming system. ‘Birthday Tomorrow’ would be sufficient in our example.
- Once you have confirmed this, the new profile opens automatically.
You will then complete the profile:
- On the right-hand side, you’ll find the library containing all the profile conditions you can use to create a profile.
- In our example, we want to filter the database according to date of birth.
Type ‘Date of birth’ (or just part of this text) in the search field above the library. After a second, the search term is applied. Drag the birth date condition from the library to the canvas in the middle. - Double-click on the condition (or click on the gear) to configure the condition.
Using a date condition produces many possibilities within Deployteq. In our case, the correct settings are: ‘is’ > ‘Relative date’ > ‘Earlier/Later’ > ‘1’ > ‘day’ > ‘in the future’ and ‘Ignore year in comparison’. (Play with the settings to see what’s possible and what the results are.) - Save the profile (top left button) and calculate the profile (button next to it).
- Repeat step 2 with the ‘Gender’ field and drag this condition to the second column, under the result of your profile calculation. This condition is easier. Select ‘is’ and ‘Female’.
- Now we want to know if these people can be e-mailed; we use the condition ‘Mailable’ for this. Place this condition in the third column.
The profile is now ready to use. You can now use a campaign, for example, to send out an e-mail each day to all the people who satisfy the profile. The profile is selected, and thus recalculated, every day, so that only those people satisfying the conditions on that day receive an e-mail.