| Icon | Function | Settings | Exit |
|---|---|---|---|
| The possibility to determine the next step in a flow based on whether or not a link has been clicked on. | When determining the next step to this object, you can exclude certain links in the e-mail (e.g. Continue on click, but not when the unsubscribe link has been clicked). Always set a timer because no one will have clicked immediately after the e-mail has been sent. It is also possible to determine the next step when a specific link has been clicked on. This is done by designating a tag in the e-mail links. |
|
| To determine whether one of more customers have opened (or not opened) the e-mail. | Follow up the openers or non-openers after a specified time (timer) based on a previously sent e-mail. For example, you could send a reminder e-mail to those who did not open the e-mail. |
|
| To determine whether an e-mail sent to one or more customers has bounced. | Possibility to include the bouncers, non-bouncers, or other type of bouncers in a follow-up step within the campaign after a specific amount of time. For example, you could create an export of the bouncers for your customer service department. |
|
| The ‘Apply Condition’ object sets a condition with which a fork in the path can be created. A group of contacts that fulfils the condition follows a different path from the group of contacts that does not fulfil the condition. Different follow-on objects can be defined for each of the two groups. | First give the condition a name. Then create one or more conditions by selecting a field. You can choose between a default customer field, a customer option field, a campaign field created during this campaign, or an environment field created during this campaign. Then choose the condition (e.g. ‘is equal to’ or ‘starts with’). Choose the context of the value: ‘fixed’ (a fixed value such as a number) or ‘environment’ (an environment field from this campaign). Finally, enter the value that the condition should compare with the chosen field. The value is case sensitive. In ‘Condition Criteria’, you can specify whether contacts should fulfil all conditions, or at least one of the conditions. |
|
| The 'In Profile' object essentially functions the same as the 'Apply Condition' object. However, it checks if someone meets the conditions set in a profile. It's important to specify when not to use it. The In Profile-object is not used to initiate a mailing. It does not select contacts within Deployteq. | You select the profile that someone needs to meet. This could be used, for instance, if someone completes a form (you have no control over the selection). You use the profile to check whether someone has placed an order in the past month and continue the flow based on the answer. |
|
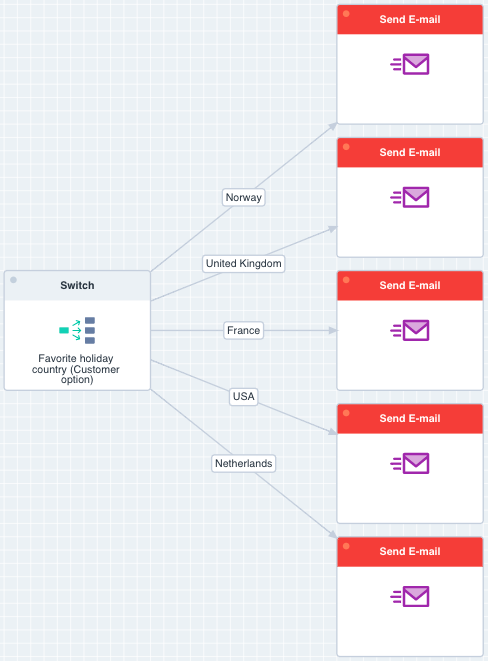
| The 'Switch' object allows you to split customer selections based on customer data. The functionality is similar to (several) linked 'Apply Conditions', however this object is much more efficient. |
Select the field you would like to use. You can use: Customer fields, Customer option fields, Campaign option fields and Environment fields. In the 'Value' column, enter the values you would like to use to split your customer selection. The should be values you can find in your Customer database (Screenshot Configuration). You can now create a link for each defined value. The 'Other' link will be used if the customer doesn't match with the given values (Screenshot in Campaign). |
|
| The ‘Link to campaign’ object is used to direct customers in the current campaign to another campaign. | Give the object a name. Select the campaign to which the contact should be added and specify with which ‘Start on Event’ the customer or customers should enter the campaign. For example, when someone has completed this campaign, they enter the next step of your customer journey. To prevent the campaign from getting too big, you can use this object to forward them to a new journey. |
|
| The ‘Split flow’ object is used to split a selection of contacts created previously into several directions. | First specify on what basis you want to split the contacts: 1. Split equally, 2. Split using a percentage, or 3. Split using a number. You can then enter the different flow names and configure the distribution. You will then see the flow names when linking the object to the next object. |
|
| The ‘Checkpoints’ are used for Deployteq Analytics. When someone reaches a certain point in the campaign, this is counted in the checkpoint. You can then use these figures in your Analytics dashboard. | Give the checkpoint a name so that you can find it in Analytics again. |
|
| The ‘Set timer’ object makes it possible to define a fixed time interval between different objects. A timer can be used, for example, to specify that an e-mail should be sent to a customer a day after the customer has subscribed. | Give the timer a name. You can then decide if you want to wait a specific number of days before the flow is continued or wait for a specific moment, e.g. wait until Monday or wait until 12:00 PM. If you choose a period, you must set an interval: minute, hour, day, week, or month. In ‘Offset’, enter the number of time units, e.g. wait 3 days. |
|
| This object ensures that e-mails are only sent within specific times or that only a specific number of customers receive an e-mail per day. This allows you to limit the burden on your customer service department or, for example, refrain from sending e-mails on a Sunday if that is not what customers want. | Specify how many customers are allowed to pass through this object per hour, day, week, or month. You can then specify the days on which e-mails may be sent. Finally, you can also specify times between which e-mails may be sent, so that, for instance, your customers are not sent e-mails in the middle of the night by an automated process. The ‘Continue’ exit will be used until the limit is reached. A signal is sent when the limit is reached and you can search for yourself via the ‘Limit has been reached’ exit to send yourself a notification e-mail. The customers who you can no longer send an e-mail to once the limit has been reached are directed through the ‘Past limit’ exit. These people can be placed in a group that is added to the flow again the next morning when the limit is reset. |
|


