One way to get customers and their data into Deployteq is to use a file import. Data that is imported can be modified or improved by means of a plug-in. For example, the first letter of a name can be turned into a capital letter while the rest of the name becomes or remains lowercase. Under Plug-ins, you’ll see which other settings can be found in Deployteq to improve your data. Below, we give you all the information you need to correctly import the data.
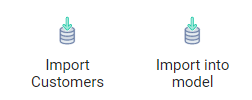
Use the wizard to import a file step-by-step and enter it in the CRM in the required manner. To start, click on ‘Import customers’ in the menu. You can import CSV, XML, and Fixed Length files. This can be done at any time or at a scheduled time.
Importing a CSV file
First select the file you want to import. You will see the File manager where you can select a file. Here, you can do everything that you would normally do in the file manager, including uploading a new file. Once you have selected a CSV file, you will see the first step in the import wizard. Deployteq recognizes various details from the file, such as the file type and character set. You will then see the option to check ‘First line is header’. Check this option if the first line of your file consists of column headers and does not contain any personal data. The data in the first line (the column headers) will not be saved to the database.
The columns in the CSV file are separated using a specific delimiter. Deployteq, by default, recognizes most delimiters (e.g. ; , . - / ). Check whether the correct delimiter is recognized and change it if necessary. If you use a quotation mark, add it to the ‘Text qualifier’ entry field. The quotation mark is then filtered out. Check carefully whether all sample lines are displayed properly at the bottom of the screen. If so, click on ‘Next’ to continue.
Importing a Fixed Length file
When importing a Fixed Length file, you will have the option of checking ‘First line is header’. Check this option if the first line of your file consists of column headers and does not contain any personal data. The data in the first line (the column headers) will not be saved to the database.
Now define the length of the fields. There are three ways to do this:
- Define field by length:
For every field, enter the number of characters the field should contain. Use commas to separate the numbers of characters. - Define field by position:
Enter the position of the first field character and use commas to separate positions. - In the ruler above the sample lines:
Use your mouse to click on the start/end positions of a field.
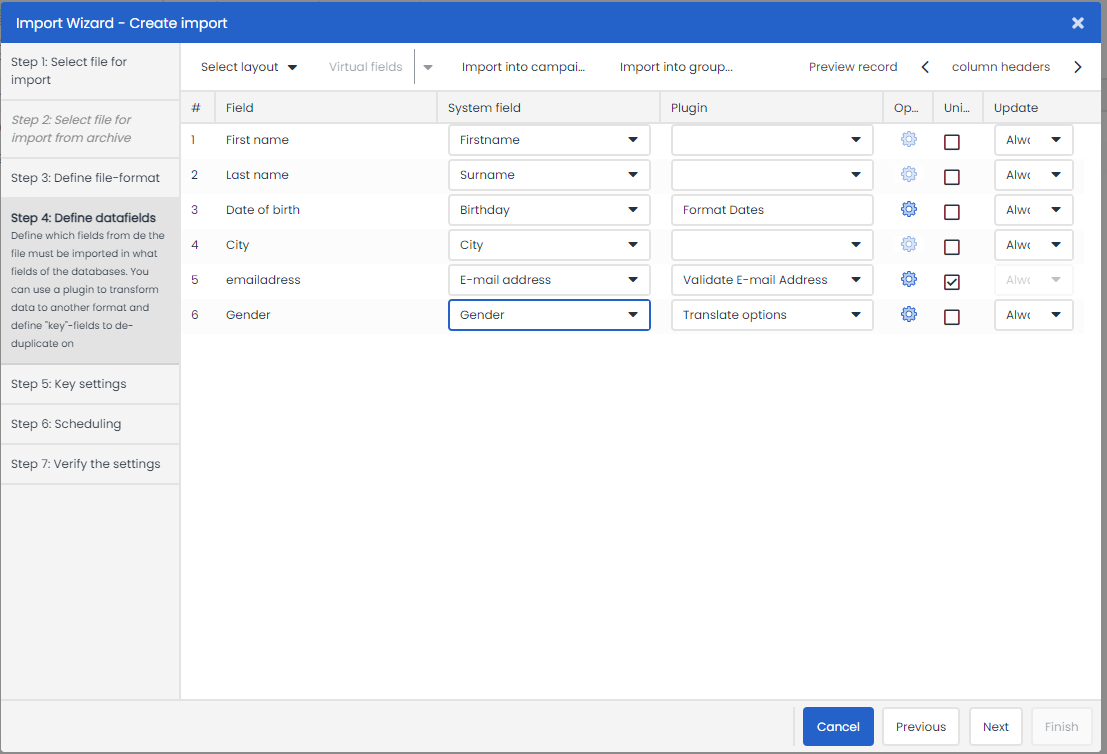
Mapping fields
In this step, you see a table with all the fields found in your file. The fields are displayed on the left as they are named in the import database. Use the drop-down menu under ‘System field’ to indicate which field in the Deployteq database this field corresponds to. If you want the imported customers to be entered directly into a campaign, you can link them by clicking on ‘Link to campaign’ at the top.
If you do this, you can also use the campaign option fields when linking fields.
If you will be performing this import more often but don’t always want to create the same links, you can save this arrangement as a ‘layout’. Go to ‘Select layout’ at the top and click on ‘Save as...’. Give your layout a clear name, such as who you are importing or the filename. The layout name must be unique before you can save it.
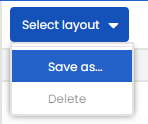
If you want to select a previously saved layout, select the layout in the drop-down menu. When you click on ‘Load’, the fields will be displayed according to this layout. It is also possible to delete an existing layout. When you select a layout from the drop-down menu, the ‘Delete’ option will be displayed.
and select the desired group. Either choose an existing group or create a new one.
Deduplication
Deployteq can compare your import data to the data in the database. This enables you to avoid duplicated contacts in your database. You can choose which fields to compare, e.g. name, e-mail address, customer number, or a combination of different fields.
When you perform deduplication on two different fields, these should be fields that are not modifiable. If, for example, you performed deduplication on e-mail address and customer number and someone changes their e-mail address in another system, this would produce a new e-mail/customer number combination and therefore result in a new customer.
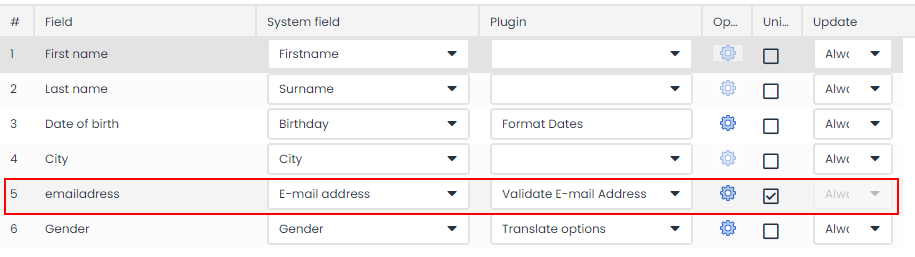
Use the ‘unique’ column to specify whether the field in question should be deduplicated. During the import process, this field will be compared to the existing record data in your database. The next step defines what should be done with contact data already in the database.
Deduplication based on e-mail address
The ‘Validate e-mail address’ plug-in contains an ‘Allow empty’ setting that you can use to define how blank fields should be handled:
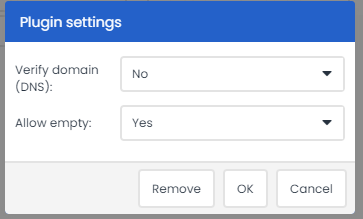
If the ‘Allow empty’ setting is set to ‘No’, contacts without e-mail addresses are skipped. The skipped records can be downloaded after the import process, with the reason for skipping these records displayed in the last column. The ‘Allow empty’ setting can only be set to ‘Yes’ if you perform deduplication on another field in the database.
DNS check
Here you see the option to perform a DNS check as well; 'Verify Domain (DNS)'.
The email validation plugin DNS check verifies the DNS settings of the domain used in the email address during the import. If no MX (Mail Exchange) record is found in those DNS settings, the domain is unable to process emails, and the DNS check fails. In this case, the record is skipped during the import with the message 'Unknown Email Address.'
This plugin does not check each individual email address. If you require this, it can be done with our Email verification app
Updating fields
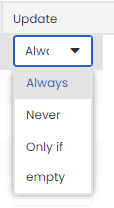
You can specify in the menu whether a field may be updated. If you do not specify a choice, the field values from the import file will always be imported and updated. If you want to save the values that are already in Deployteq, set the field to ‘Never’ (never overwrite existing data). If you only want to update the data when the field is blank, set the status to ‘Only if empty’.
Plug-ins
Plug-ins are used to edit the data in the fields. Once you have defined a field, you can select a plug-in from the drop-down menu. These plug-ins act as filters during the import process, which means that you can still edit the data that you import to Deployteq before it is saved. In this way, you can ensure that ‘polluted’ data in your import file is ‘clean’ when it is imported into Deployteq. We explain below what the various plug-ins do with your data.
Plug-in options:
Format company name: It the company type is included in the company name (such as B.V., N.V., V.O.F., etc.), these are automatically stored in Deployteq with capital letters and full stops during the import process.
Validate e-mail address: During the import process, this plug-in checks whether the import value meets the conditions of an e-mail notation. The import value must contain a ‘@’ and a ‘.com’ or ‘.nl’ etc. It is also checked whether the domain name is known. In addition, you are asked whether the e-mail address field is allowed to be blank during the import process. In practice, this application is often used when sending SMS messages in Deployteq to contacts for whom you may not always have an e-mail address. In this case, it is important that deduplication is not based on e-mail address but on another field, such as customer number.
Translate options: This plug-in makes it possible to save the values from your import file with a different value in Deployteq. Let’s say you want to import the gender data using the default fields in Deployteq. If the import file contains the values ‘M’, ‘F’, or ‘U’, you can use the ‘Translate option’ plug-in to save these values as ‘Male’, ‘Female’, and ‘Unknown’ in Deployteq.
Generate password: This creates a unique password in a desired field during the import process. The value is stored in Deployteq using bullets so that it is not visible to anyone. The value can, however, be used as a readable value in an e-mail, which could be useful if you give each person a unique code to access a special promotion.
Format initials: This plug-in ensures that all values are stored in Deployteq using capital letters and full stops, e.g. ‘mj’ will be stored as ‘M. J.’ in Deployteq.
Validate mobile phone numbers: This plug-in checks whether the country code in the field to be imported corresponds to the country code of the relevant brand setting. If not, the record is not imported into Deployteq. If your import contains multiple country codes, do not use a plug-in. The values as contained in the import file would then be imported in that way.
Validate phone numbers (The Netherlands): This checks whether the area codes for the regional or national telephone numbers and the number of characters correspond to the telephone numbers valid in the Netherlands. In this case too, any unknown telephone numbers will be skipped and not imported.
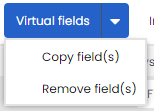
Split address: This plug-in makes it possible to split the house number from the street name and save the values in different fields (e.g. ‘house number’ and ‘address’). It is important to first copy the import field using the ‘Virtual fields’ button and then to select ‘Copy field(s)’.
Split surname: This is similar to the ‘Split address’ filter and makes it possible to split a surname. You could, for example, save the maiden name and married name of a contact in different fields. Deployteq will look at the delimiter ‘-’ to separate the values. Again, you must use virtual fields to copy the import field.
Replace string: This makes it possible to replace the value in a field with a different value. When selecting this option, you can specify a search value (‘Search string’) and indicate which value should be used to replace it (‘Replace string’). You could use this plug-in, for example, for a customer’s origin. This could be referred to in your CRM using codes that do not mean much to most people. You could then convert these codes during the import process into literal words, such as 1 = Telephone acquisition, 2 = Website, etc.
Capital letter (first character): When importing first names or surnames, for instance, they may not always start with a capital letter. This plug-in makes sure that the first letter or – in the case of a double first name or surname – every first letter is stored in Deployteq with a capital letter.
Capital letters (all characters): This stores the entire value of the import value in Deployteq with capital letters.
Validate surname prefix (Dutch): When importing prefixes as a separate field (if not already included in the surname), you can configure Deployteq to check whether they correspond to the prefixes generally used in the Netherlands, such as ‘van’, ‘de’, ‘van de’, ‘van der’, etc.
Validate website address: If the value of the import field does not start with ‘HTTP’ or ‘HTTPS’, followed by a ‘WWW.’ and a domain name, and end with ‘.COM’, ‘.NL’, ‘.EU’, etc. the customer record will not be imported.
Add text to beginning: When importing a value from your import file you can add a generic value to the beginning before it is stored in Deployteq. This could be a salutation for a field or a fixed country code for every telephone number.
Add text to end: Similarly to adding text at the beginning, you can also add a generic value to the end of every value from your import file.
Validate bank account number: When importing a bank account number, you can check whether it complies with the redundancy check, including the possible bank number notations. If a record is not correct, it is not imported.
Validate Social Securiy Number (BSN): A check can also be performed on Dutch BSN numbers that are imported to see whether they comply with the national or international standards. If a record is not correct, it is not imported.
Fields containing a date or time can be checked to see whether the time format of the import file corresponds to the time format used in the database (Deployteq uses the British time format). Use the ‘Replace string’ plug-in to replace part or all of the field text. All data in this field will be modified. In the ‘gender’ field, use the ‘Translate options’ plug-in to check whether your allocated name corresponds with the name in the database. This plug-in is automatically used by Deployteq.
Virtual fields
You can select ‘Virtual fields’ from the ribbon. This enables you to copy, merge, or delete fields in your import file. You could, for example, copy a field if you have a single address field with street name and house number in your import file, but would like to save this in Deployteq as two separate values. On the other hand, merged fields allow you to fill one field in Deployteq using two fields from your import file.
Duplicate records
You may have an import file which you believe contains less reliable data than the data in Deployteq. In that case, you can also choose to only import new customers. In step 5 of the wizard, you can indicate what should happen to the data of contacts that are already in the database. Here, you can also choose to add customers to a group or campaign. You can even make a distinction between existing customers and new customers.
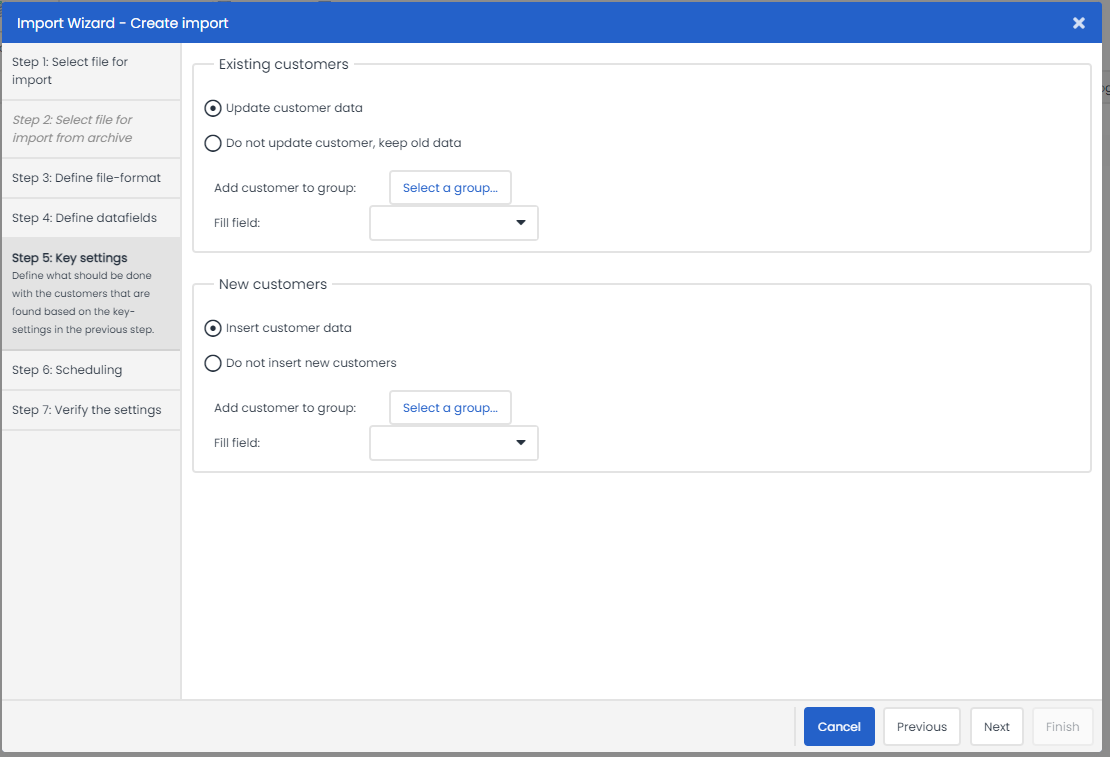
As part of the import process, you can choose to add the newly created customers to a campaign immediately by clicking on ‘Link to campaign’ at the top. If you do this, the campaign fields that are created will also be available for the field links. You could also add the people to a group. There are two options available. In step 4 you can use the ‘Link to group’ button that is also shown at the top. This links all customers from this import to that particular group. You can also create a distinction by waiting until step 5 to link customers to a group. Here you can differentiate between new and existing customers and link each of them to their own group. In this final step, you could also add a fixed value to a specific field. For example, you could add a source to the new customers if this file is the result of a specific promotion.
Repeating an import
Check the ‘Repeat import’ option to repeat an import process. Select hours, days, weeks, or month and specify a number. You must also provide a filename and can use variables to avoid using the same file for the import every time.
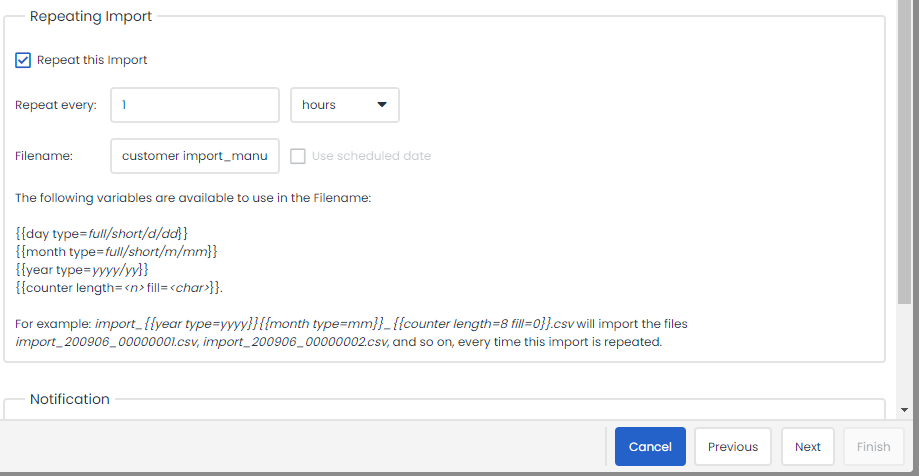
The following variables are available:
{{day type=full/short/d/dd}}; {{month type=full/short/m/mm}}; {{year type=yyyy/yy}}; {{counter length=<n> fill=<char> start=<n>}}.
Use scheduled date
The ‘Use scheduled date’ checkbox becomes active when the filename contains date variables ({{day type=full/short/d/dd}}, {{month type=full/short/m/mm}}, or {{year type=yyyy/yy}}). If the ‘Use scheduled date’ checkbox is ticked, the day on which the import is scheduled will be used. If nothing is checked, the day on which the import is carried out will be used. This checkbox is disabled by default.
Exporting skipped records and moving an import file
In the settings, you can give the import a specific name so that it is easy to find again later in your import summary. You can also start the import at a later time. Use ‘Additional settings’ to define whether the import file should be deleted once the import is complete. You can also move it to another folder if, for example, you want to maintain an archive, but want to keep the upload folder clean. Finally, you can export the skipped records of this import to a folder of your choice. This is useful if you have an external system and want to keep track of which records were not approved by Deployteq, such as e-mail addresses that are skipped because they are invalid, so that you can make a note of them here in your CRM.
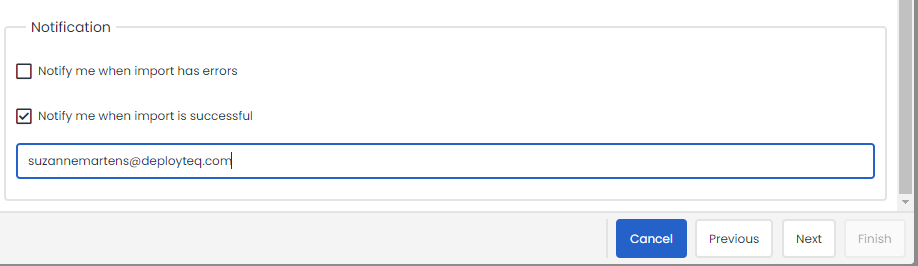
Lastly, you are given the option of sending an e-mail as soon as the import has finished. You will receive an e-mail when the import has finished containing the quantities in your file – how many customers have been created new, updated, or skipped.