Once the data model has been constructed, you will want to import data into it. You can do this via an API, when it has to be done in real-time, but you could also configure an import (including a periodical import). Your system places files ready on an SFTP server so that they can subsequently be imported into Deployteq. This ensures that you always have the latest information to create flawless profiles and campaigns that can be set up on the basis of this historical data.
Although it is largely similar to importing customers, there are a few differences. In most cases, there is a connection with the customer or another table. This data must also be included in your import file so that it is clear what a specific line corresponds to. This section explains how to insert the data in your tables in Deployteq.
Import file
There are two places where you can start an import. The first place is under Imports in the menu. At the top left, next to the ‘Import customers’ buttons, you’ll also find an ‘Import into data model’ button. The second option is via the data model. At the top right, you’ll see an ‘Import into model’ button. Click on either of these buttons to bring up the Deployteq import wizard. You are first asked to select the file you wish to import. These files can have a .CSV or .TXT extension. There are three things that are important in these files:
- A unique data item
Often, an orderID, productID, or SKU will be used here. Although a productID or SKU can appear in several orders, deduplication is performed within the linked order, which means it can be used as a unique data item in the data model. - A reference to the linked table or customer
When a table is linked, e.g. from orders to ordered products, the unique data item for the order must also be included. Or you can match the order that is linked to the customer via ID, Customer number, or e-mail address. - Every order or product is given a new line
If an order has several products, you will need to include a new line in the file for each product and link the same orderID to each of them.
When you have selected the files, you can also configure a number of settings here to enable the file to be read in properly. For example, Deployteq already recognizes which delimiter, text indicator, and character set are used in your file. You can always change these if you prefer. You can also configure whether you want to delete or move the file after import for archiving purposes. If you do not configure anything, the file will be kept. At the bottom of the window, you can see how the file is imported by Deployteq with the current settings. This enables you to check whether the columns are aligned and whether the chosen character set registers any special characters properly.

Below is an example of a file containing orders and a file containing the corresponding products:
email;order_id;date;total_amount;discount;number_products;type;branch_id;delivery_method;payment_method
manual@deployteq.com;11223344;2023-12-01;250;0;2;WEBSHOP;123;POST;IDEAL
manual1@deployteq.com;22334455;2023-12-12;100;10;2;WEBSHOP;123;PICKUP;IDEAL
manual2@deployteq.com;88112233;2023-11-16;100;0;1;WEBSHOP;156;POST;IDEAL
manual@deployteq.com;12345;2024-01-21;105.2;0;2;WEBSHOP;123;POSTNL;IDEALorder_id;product_id;name;quantity;price;discount;total_amount;group;product_size;product_color;product_brand
11223344;556698;Sweater;1;125;0;125;LADIES;M;Gray;"BRAND X"
11223344;556699;Sweater;1;125;0;125;LADIES;L;Gray;"BRAND X"
22334455;442288;Necklace;2;50;0;100;ACCESORIES;STD;Purple;BIJOUX
88112233;339988;"Red skinny jeans";1;100;0;100;LADIES;M;Red;"BRAND Y"
12345;99991;Wintercoat;1;95;0;95;JAS;L;Gray;"BRAND A"
12345;99992;"Wool scarf";1;10.2;0;10.2;SCARF;STD;White;"BRAND B"Linking fields
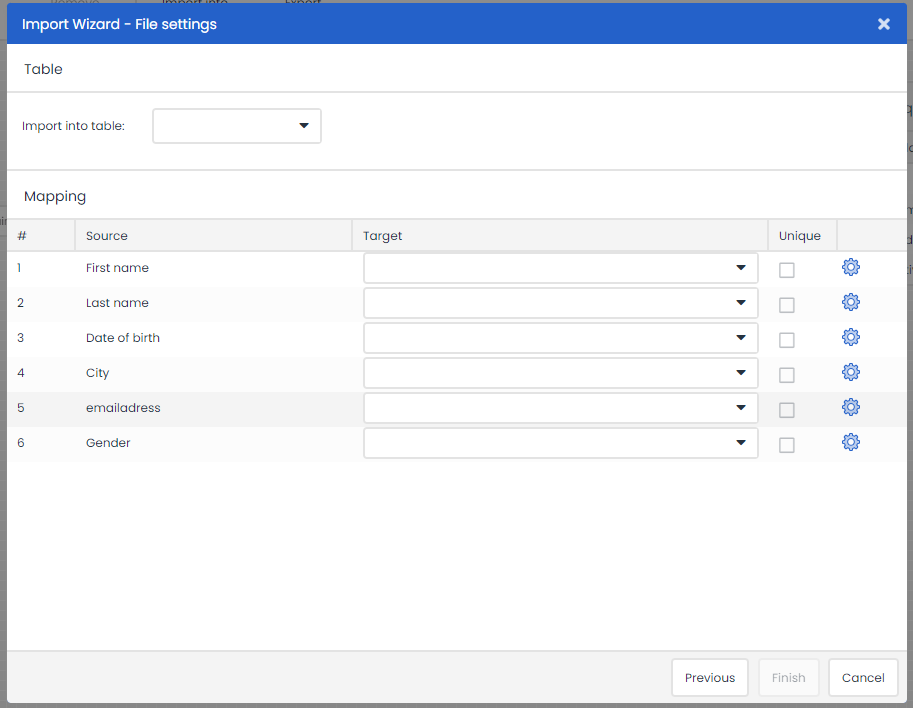
Next, you will link the fields. This process is slightly different from linking fields during customer import. The first step in the import process is selecting the table into which you want to import. Once you've chosen this, you can proceed to link the fields. If the column headers in your file have the same names as the columns in your table, Deployteq recognizes them immediately and links them for you. Verify these connections and, if necessary, link any remaining names to the columns in your data model.
If the data needs to be linked to a customer or another table, there will be one column containing this data, such as the customer's email address. When linking fields, you will also see the fields from the customer or other table. For example, for a customer, there might be a 'Customer: Email Address.' Select this to establish the correct connection. Lastly, to ensure that orders are not always created as new, choose the field that is unique to the table during the linking process, allowing Deployteq to perform proper deduplication.
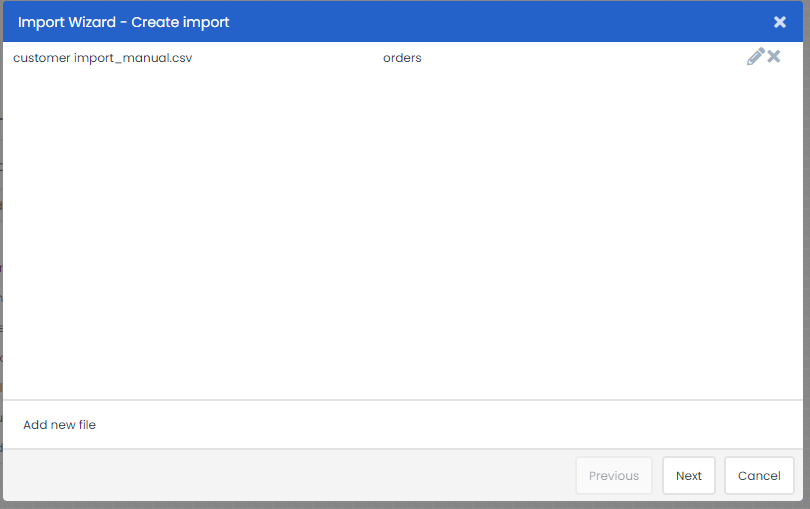
In the data model, you can load multiple files in one import task. To do this, finalize this linkage, and you will enter the overview of import files. Click on 'Add New File' in the bottom-left corner, and here you can directly add the ordered products, for example. You do this in the same way as described above. Once you are satisfied with the settings of your files, click 'Next' to set up the import schedule.
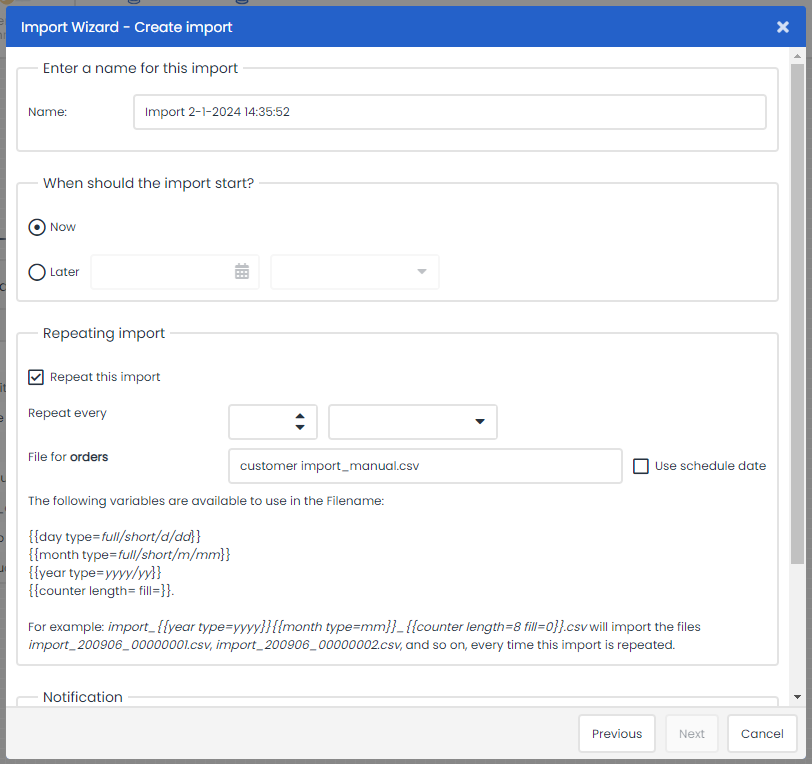
Planning your import
After configuring your files, you can set the import times. Give your import a clear name so that you can easily find it again in your import overview.
If you want to schedule this periodically, there are options available. You can set it to run every day or every week. Additionally, you can incorporate variables if there is a date used in your import file. For example, if you have an import file named orders_20190123.csv today, it will be orders_20190124.csv tomorrow. To accommodate this, you can use variables displayed under the file names as an example. In the settings, you would then input orders_{{year type=yyyy}}{{month type=mm}}{{day type=dd}}.csv.
Finally, you can set up a notification to send an email after each import run, containing information on the quantities processed or, in case of failure, the reason for the unsuccessful import. This could be, for instance, due to denied access to the SFTP after changing a password.
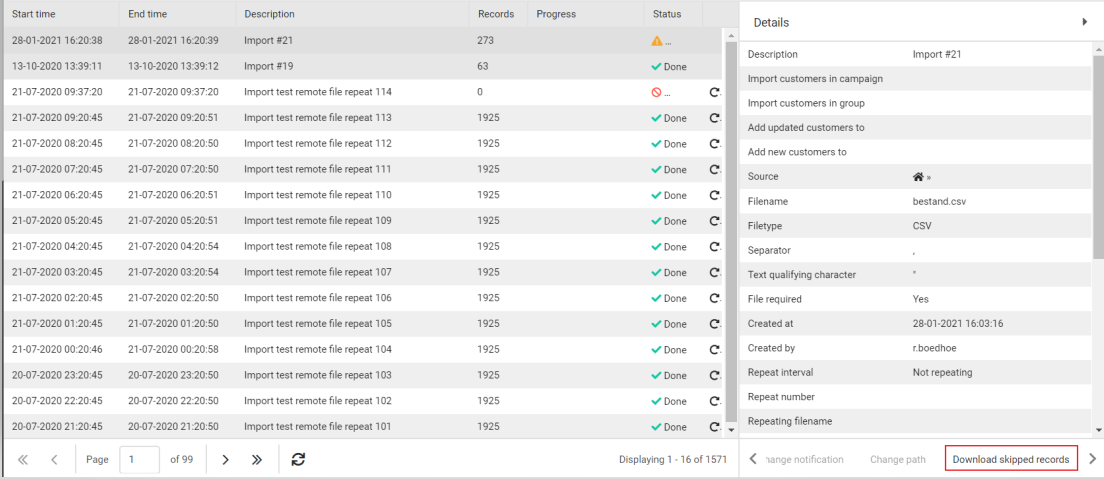
Skipped records
After an import is executed, it will appear in the complete overview of imports. In these imports, records can be skipped, and you can download this skipped records file by selecting the import task, and on the right side, clicking on 'Download Skipped Records.' Common reasons for skipping records include missing customers in the orders. These customers must already exist in Deployteq before executing the import in the data model. If you have a reference table for additional information about your products, for example, these references must also be present before you can import the ordered products.