If you want to send an e-mail immediately after uploading a file with customer data or do not want to have to keep uploading names via imports, the CSV trigger is the answer! By using a certain filename, Deployteq immediately knows which of your campaigns to trigger and you can specify in the campaign which subsequent actions are needed. In this way, you can easily establish links between systems and execute batch actions.
The CSV trigger is a customized project that can be set up for you. Call us on +31 (0)30-698 8080 if you want to add it to your portal.
SFTP location
First of all, the CSV trigger requires an SFTP to be set up in Deployteq. If you already have one, we can get started straight away; otherwise, we will create one for you. A folder is created on the SFTP for the CSV trigger. All other folders can still be used for other purposes. With your input we will look at what the best structure would be, but it will be similar to the following:
- Root
- csv upload
- <brand name> (so it can be used for several brands)
- Active
- Done
- Failed
- Upload
- <brand name 2>
- etc.
- <brand name> (so it can be used for several brands)
- csv upload
The files are placed by you in the ‘Upload’ folder. When a campaign is found with the correct name, the file will automatically be moved to ‘Active’, where Deployteq reads in the customers. Once that has been completed successfully, the file is moved to ‘Done’. If there is an error in the file, e.g. due to column names, the file will be moved to ‘Failed’. The reason for the failure will be specified in the notification you receive from this process. Otherwise, you will receive a 'success' e-mail.
Campaign
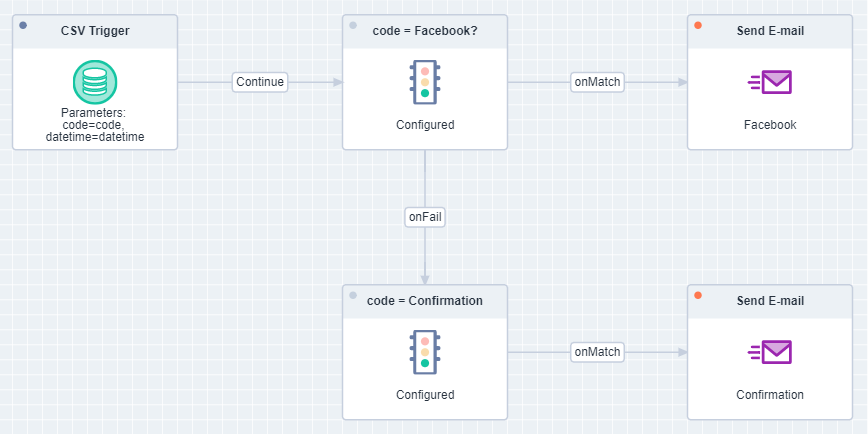
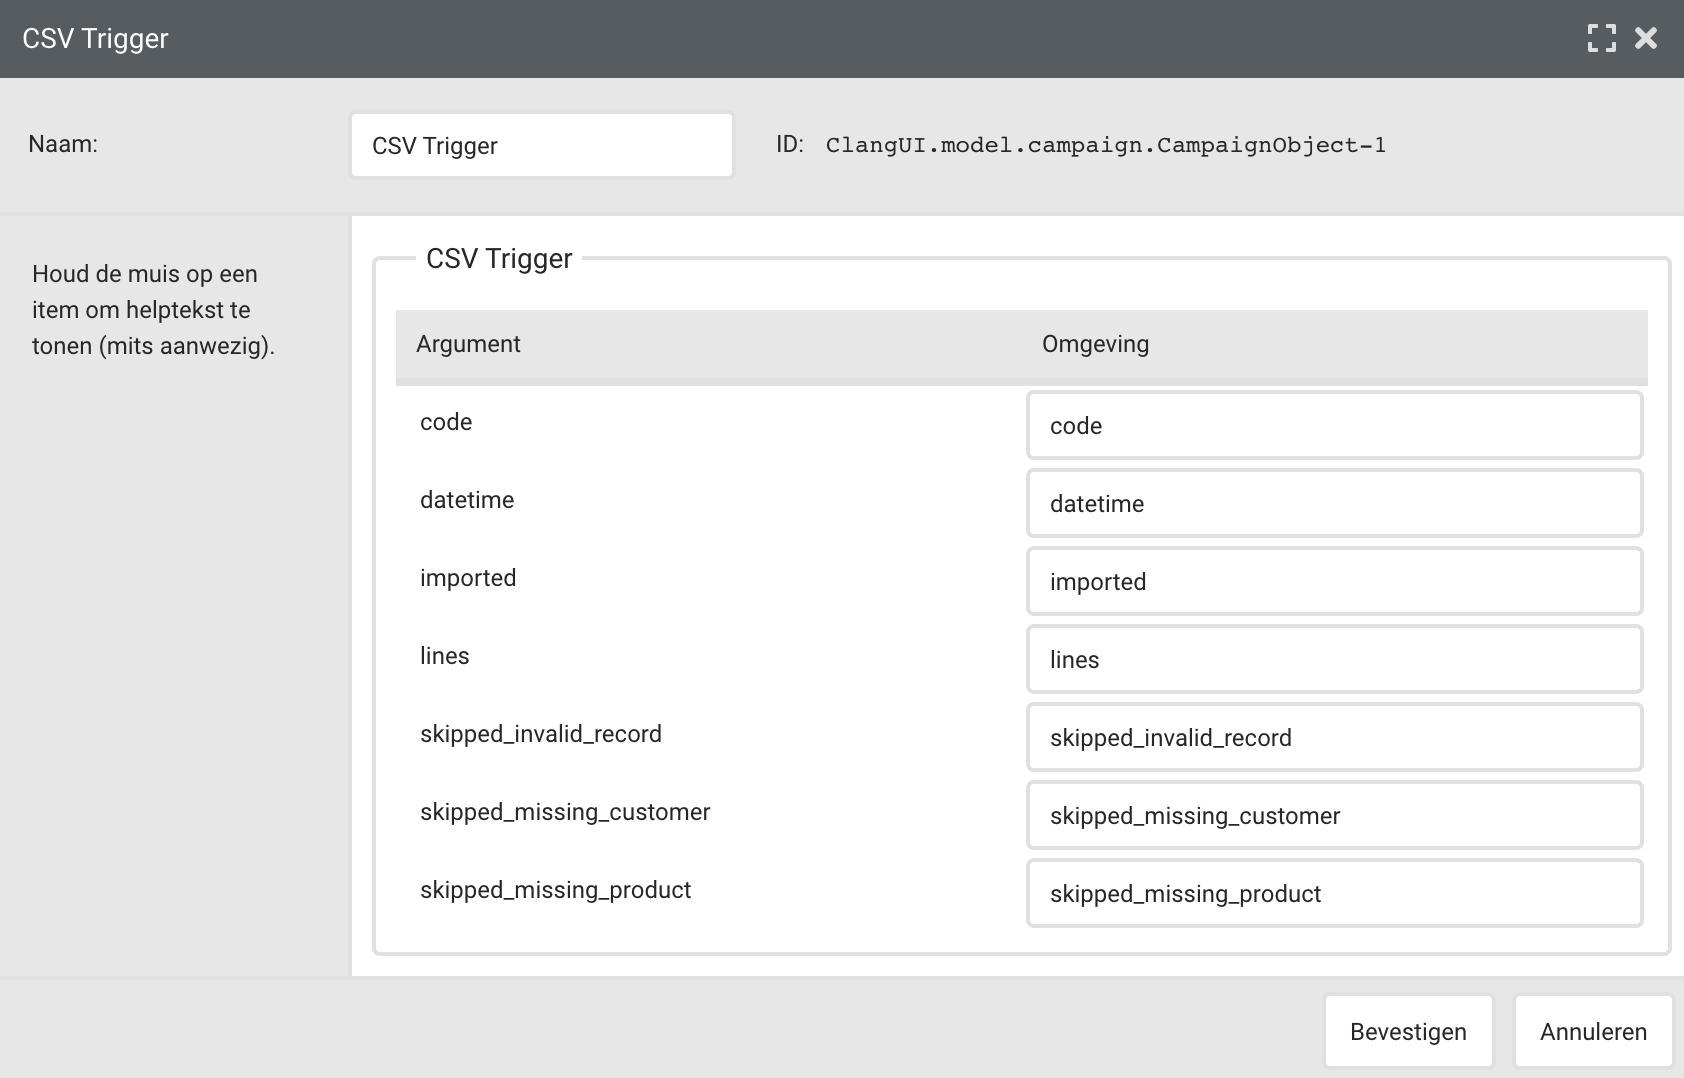
When the CSV trigger is activated for your brand, you will receive a new campaign object called ‘CSV Trigger’. This starts the campaign on a file. After this, you can build a campaign, in the usual way, with groups, e-mails, and conditions:
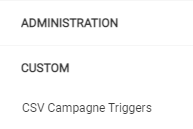
When the campaign is created with the CSV trigger start object, you can set this to a campaign code that you can use in your filename. To do so, go to the new ‘CSV campaign triggers’ menu item at the very bottom under ‘Customization’.
Here you can see an overview of the campaigns that are already configured in your brand. You will see the following columns:
- Code
This is the code that is used in your filename when uploading. - Sign
This is the separator used in your CSV files. - Campaign
The campaign that is triggered as soon as a file is uploaded. - Description
This is your own description of the campaign. Here you can specify, for example, which action uploads the file to be imported. - Icons
These icons can be used to perform actions on the trigger. From left to right they mean: edit, copy, and delete.

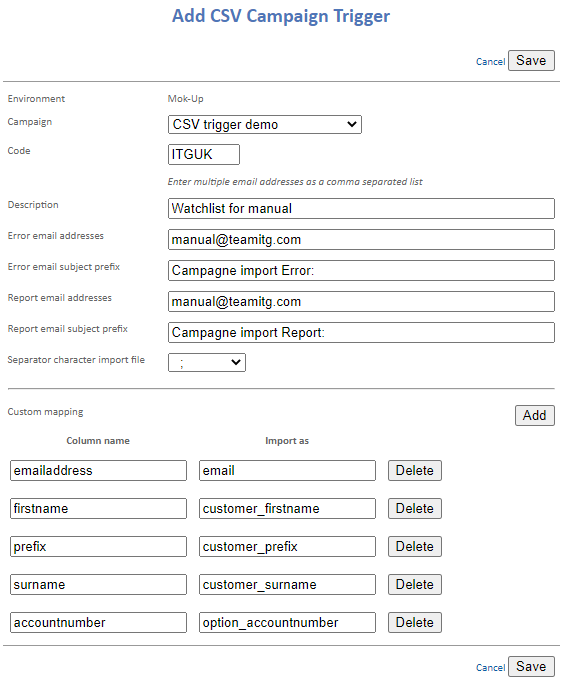
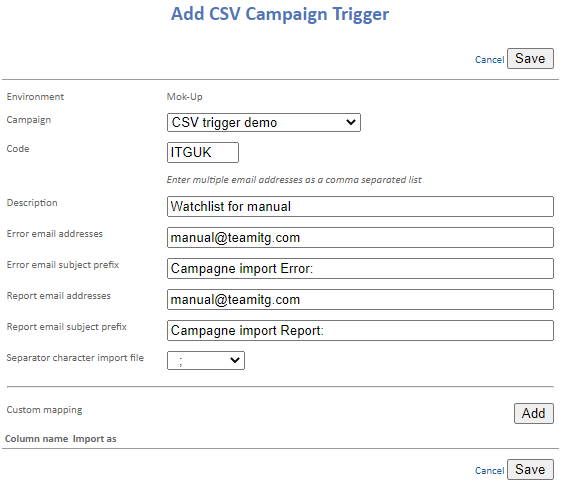
At the top right, you can add a new campaign setting. To do so, you will see a new screen containing fields to be filled:
- Campaign
A drop-down menu where you will find all campaigns with the ‘CSV trigger’ campaign object. - Code
This is the code that is used in your filename when uploading. - Description
This is your own description of the campaign. Here you can specify, for example, which action uploads the file to be imported. - Error/Reporting e-mail addresses
The addresses that should receive a reporting e-mail when things go wrong. Here you can enter multiple addresses, separated by a comma, such as the marketing and technical departments. - Error/Reporting e-mail subject prefix
We always put this at the front of the e-mail report. This enables you to add rules to your inbox, so that a certain action is taken when you receive these e-mails. This is already filled in by default, but the content can be adjusted per campaign. - Separator import file
The separator used in your CSV file. Choose from semi-colon (;), comma (,), or pipe (|). - Custom mapping <optional>
Custom mappings are another addition that can be used if the standard column names cannot be generated by your system. This is explained later under ‘Custom mappings’.
Save the settings and you can get started on uploading the file.
File name
The filename is important for triggering the campaign. As explained before, we use a code to identify which campaign to trigger. This should appear in your filename so that Deployteq knows what to do with the file.
The filename is constructed as follows:
<campaign code>_<YYYYmmddHHiiss>.csv
In the case of the manual campaign above, the full name is then HNDL_20190109113212.csv
Since the trigger is set for you as a customization, it is possible to extend the filename, as long as the characters in front of the first underscore are used to indicate the campaign.
Content of CSV file
The column titles in the CSV file are used to determine how the customers should be deduplicated and the supplied data should be processed. On the basis of a fixed prefix, data can be saved per customer in campaign fields or made available as a broadcast variable in the e-mail. Broadcast variables apply for a broadcast and are not saved in the customer record. This data can be used for conditions in the e-mail relating to whether or not to display an object, or can be made visible in the e-mail with the help of Smarty (see below).
Example of CSV
The following example is a CSV file that is suitable for the CSV trigger with deduplication based on the e-mail address field.
Deduplication
To deduplicate the customer data, the CSV file must include at least one of the following columns:
- email
- Search for the customer based on the e-mail address in this column
- clangid
- Search for the customer based on the Deployteq customer ID
- externalid
Search for the customer based on the customer number.
If multiple deduplication columns are supplied, they will be run through in the following order: clangid, email, externalid. This can be modified by mutual agreement in connection with deduplication, firstly on the basis of externalid and then on e-mail (links with CRM based on external CRM ID).
Prefixes
We then use prefixes for the column names in the file, so that Deployteq knows where to store the values. The various prefixes and their use are explained below. The prefixes we use are:
text_<name>
This variable is made available in the e-mail content as a SMARTY variable. To use it, the following variable must be added to the e-mail content: {{load_csv_data}}. To show the value of a column, it can be added using the following variable:{{$csv_data.<name>}}.
To display the value of the ‘text_personal’ column in the e-mail, see the example below:
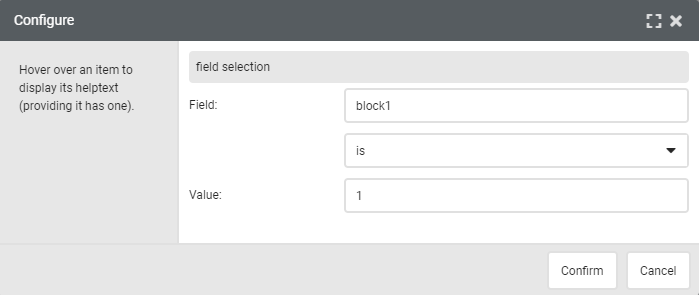
In addition, the text_ fields can be used as a condition for displaying an object in your e-mail. Go to the settings for your object in the template and select ‘Only show when’ at the bottom. Right at the bottom you will see Customization: field selection. If, for example, you use the column name text_block1 with the values 0 or 1 to show block 1 or not, then enter Field: ‘block 1’ is 1 in the settings:

campaign_<name>
The value of this field is stored in the campaign option with the same name based on the specified <name>. Depending on the type of campaign option, the data must be formatted as follows:
Text: Not applicable
Date: DD-MM-YYYY
Time: HH:MM:SS
Date/time: DD-MM-YYYY HH:MM:SS
Decimal number: decimal point, no seperation between thousands
If the campaign field does not exist in the campaign, an error will occur. You will then get an error e-mail with a ‘campaign field does not exist’ error and the file is then placed in the ‘Failed’ folder on the SFTP. Here you can see whether an incorrect spelling is used in the file or campaign, for example, or whether all fields have been created.
customer_<name>
This prefix can be used to update the standard customer fields in Deployteq. For instance, customer_lastname stores the value in that column in the customer’s last name. These fields are processed before a customer goes through the campaign.
The following field names are supported:
- customer_address
- customer_address2
- customer_address3
- customer_addressnumber
- customer_addressnumbersuffix
- customer_alt_address
- customer_alt_address2
- customer_alt_address3
- customer_alt_addressnumber
- customer_alt_addressnumbersuffix
- customer_alt_city
- customer_alt_country
- customer_alt_emailaddress
- customer_alt_state
- customer_alt_zipcode
- customer_birthday
- customer_birthplace
- customer_city
- customer_companyname
- customer_contactman
- customer_country
- customer_department
- customer_email_address
- customer_external_id
- customer_faxnumber
- customer_firstname
- customer_gender
- customer_homephone
- customer_initials
- customer_jobtitle
- customer_lastname
- customer_maritalstatus
- customer_middlename
- customer_mobilephone
- customer_pobox
- customer_prefix
- customer_state
- customer_suffix
- customer_title
- customer_website
- customer_workextension
- customer_workmobile
- customer_workphone
- customer_zipcode
The fields are treated as text, with the exception of the following fields:
birthday: date in dd-mm-YYYY format
gender: choose from MAN, WOMAN, FAMILY, UNKNOWN
maritalstatus: choose from SINGLE, MARRIED, DIVORCED, WIDOWED, ENGAGED, COHABITATING, DECEASED
It is also important to take the following into consideration:
The ‘customer_email_address’ column may only appear in the import if the ‘email’ column does not exist.
The ‘customer_external_id’ column may only appear in the import if the ‘externalid’ column does not exist.
option_<name>
In addition to the customer_* columns that can be placed in the csv, it should be made possible to add option_* columns. These columns must be named after the customer option fields, such as ‘option_loan_number’ if the customer option is ‘loan number’. The value in the csv must then be saved in the customer option field. If a column in the csv cannot be found as a customer option field, the error will be e-mailed, giving ‘unknown option_* field’ as the reason and the file will then be placed in the ‘Failed’ folder on the SFTP. Here you can see whether an incorrect spelling is used in the file or campaign, for example, or whether all fields have been created.
Examples:
- Name field in Deployteq: ‘loan number’
- Name column in csv: ‘option_loan_number’
- Name field in Deployteq: ‘loannumber’
- Name column in csv: ‘option_loannumber’
group_<name>
It is possible to indicate per customer whether they should be made members or disconnected from a group. This is possible by supplying a column with the name group_<name of the group>. A group name may not always be unique in the brand, in which case we will use the oldest group from the possible groups. You can specify this at customer level with the value 0 and 1 to indicate whether the customer can become a member of a group. If the group does not exist, it will be created as a group on the first level of the group structure.
Custom mappings
If it is not possible to use the above column names as they cannot be configured in your other system, we can use custom mappings instead. We do not enable this by default since it produces extra work, but if you need it, please let us know during implementation.
This component can be found under the settings for a campaign. What you need to do here is indicate per column name in your file what the column name should be according to the CSV trigger settings.